Introduction
Introduction
A Powerful Media Platform For WordPress
Filetrip makes it easy to distribute files from WordPress to the Cloud on autopilot. When users upload files, Filetrip sends copies to multiple destinations of your choice. You can instantly copy files to Google Drive, backup to Dropbox, or FTP files anywhere in the world…plus a whole lot more. All this happens automatically in WordPress, but totally under your control.
To make Filetrip more practical and strong, we designed it to be scalable, flexible and easy to use. For instance, administrators can instantiate unlimited number of uploaders, in which each uploader can be configured individually. For example, you can customize options like (Cloud Destination Folder, Icons, Colors, Labels, and Channels).
Moreover, the plugin is responsive and can work in multiple browsers elegantly. Also users can use it to upload their files from mobile phones (Android, iPhone, and iPad).
Smart Media Distribution

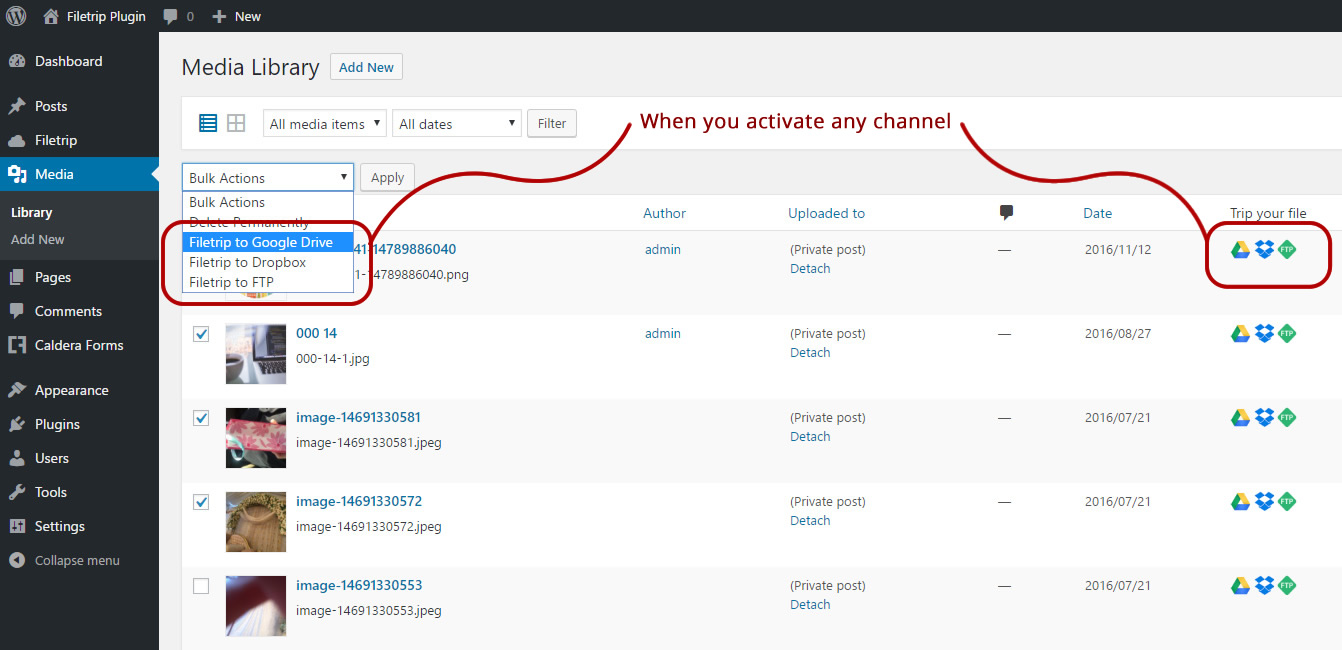
Filetrip will add the capability of sending any native Media files in bulk to whatever selected cloud channel; supporting a maximum size of 2GB per file transfer [Subjected to Customer’s Host Configuration Off Course].
Let’s see how File Distribution Center (FDC) works in a short 20 seconds video.
Website Backup
Website owners also will have the freedom of planning either complete or partial website backup (SQL, Files, or SQL+Files). The website owner can either manually or automatically setup a backup generation function. Also the system can trigger an Email notification whenever it creates a backup. What’s unique about chunk uploading is no matter how large your website is; Filetrip is capable of chunking the backup into pieces and upload them to your desired storage channel.
Many File Types
Filetrip expands on what files WordPress accepts by default, and allows many file types, including:
- Music – wav, mp3, mp4, mid, m4a, wma
- Video – mp4, avi, mpg, wmv
- Images – png, jpg, gif, bmp, psd, ai, eps, tiff, svg
- Documents – pdf, doc, docx, xls, xlsx, csv, ppt, pptx
Customizable Uploaders
Filetrip allows you to make your own customized uploaders. These uploaders have their own
settings for:
- Storage destinations files are sent to
- Restrictions on what files can be uploaded
Approval and Notifications
To keep safe, you have the ability to choose which of these files gets
Multiple Destinations
Get Your Files Where You Need Them – Easily
Filetrip is a professional-class WordPress plugin that takes your user’s uploaded files and sends then to the storage destination of your choice. Currently, you can:
- Upload to Google Drive
- Sync with Dropbox
- Send anywhere with FTP
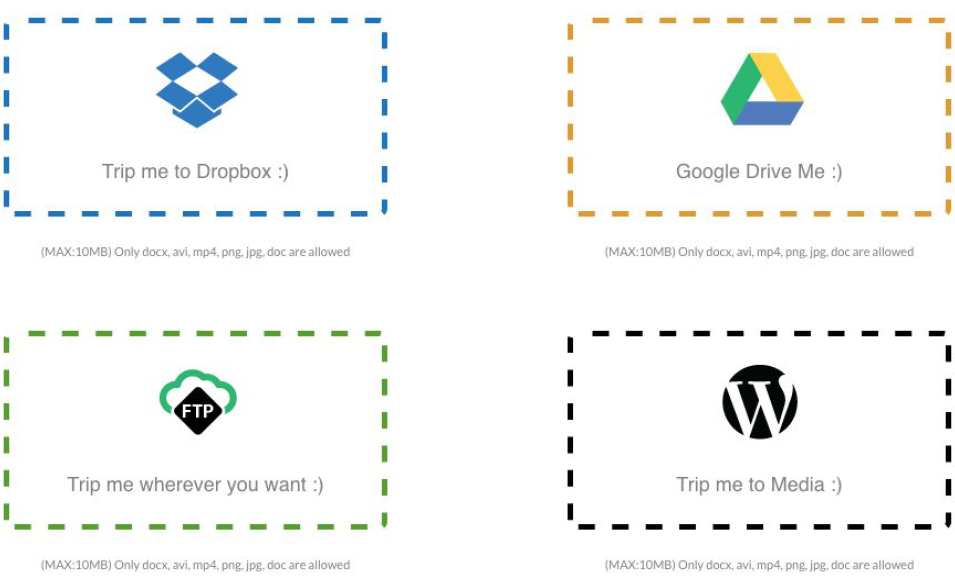
Further options will be added constantly. Simply add an uploader to a page, and watch the files appear exactly where you need them.
Installation
Installation
This section describes how to install the plugin and get it working.
Uploading in WordPress Dashboard
- Navigate to the ‘Add New’ in the plugins dashboard
- Navigate to the ‘Upload’ area
- Select
filetrip.zipfrom your computer - Click ‘Install Now’
- Activate the plugin in the Plugin dashboard
Using FTP
- Download
filetrip.zip - Extract the
filetripdirectory to your computer - Upload the
filetripdirectory to the/wp-content/plugins/directory - Activate the plugin in the Plugin dashboard
Uploaders
Create New Uploader
How to Create Filetrip Uploader
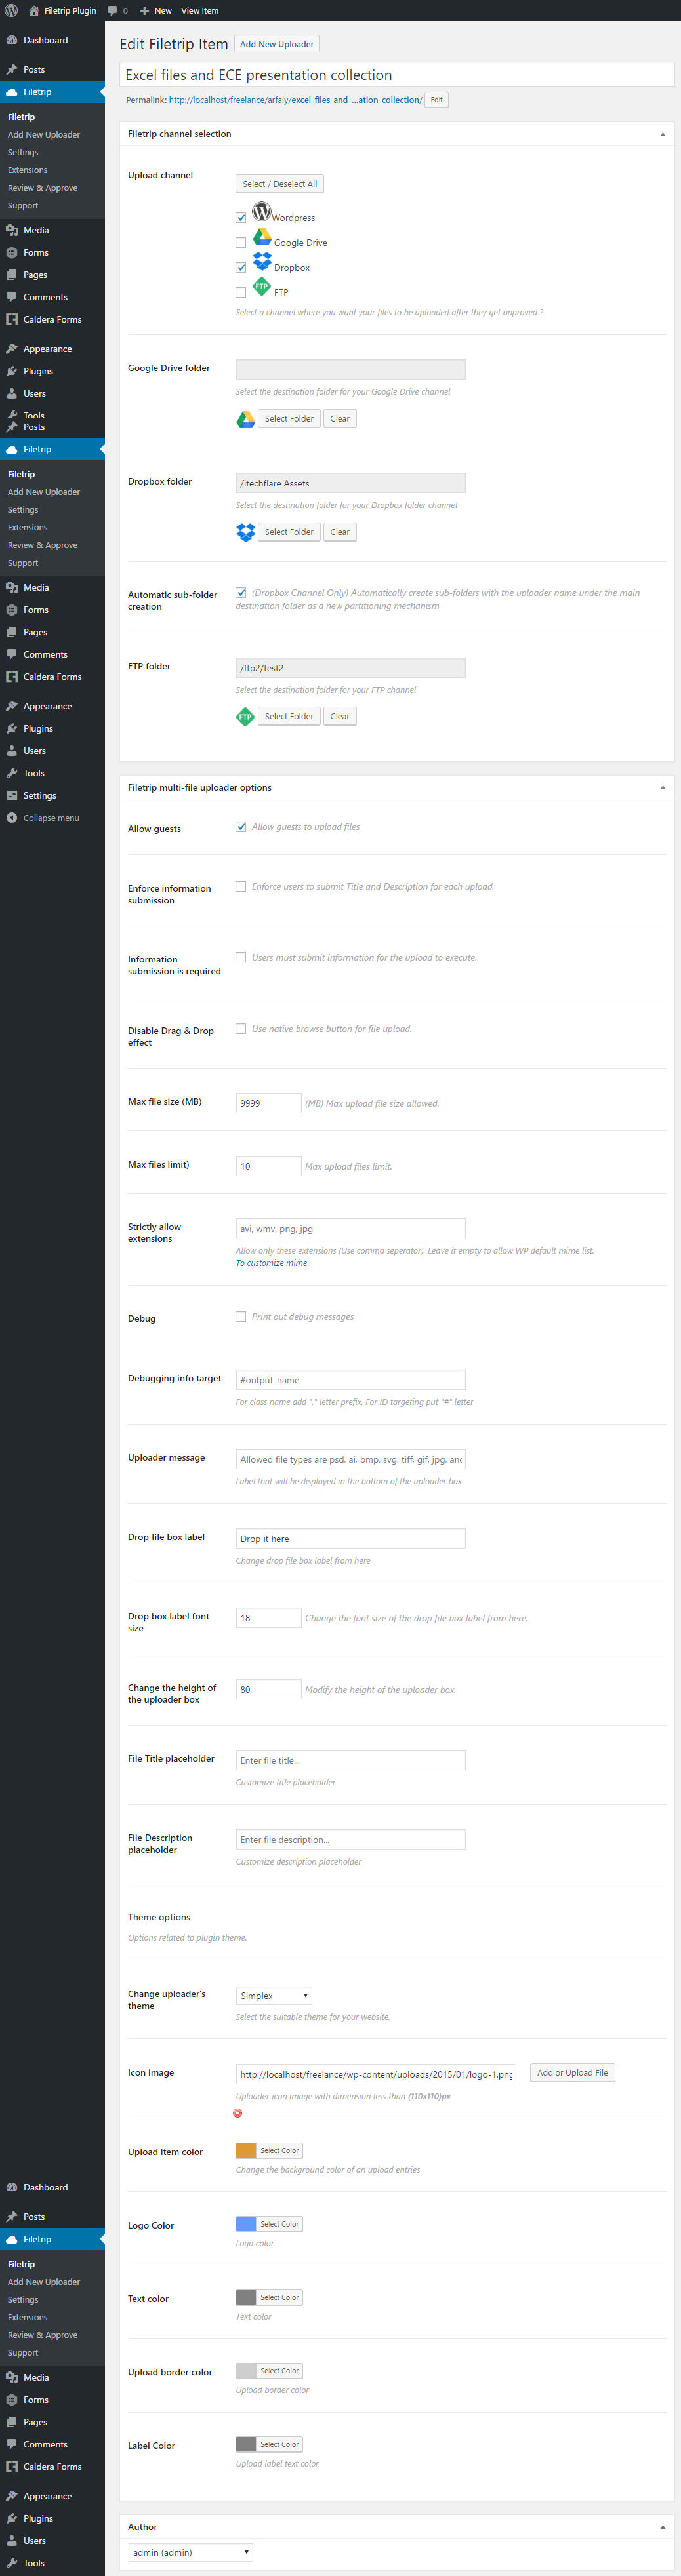
To create a new Filetrip Uploader, go to Filetrip menu and click over “Add New Uploader”. Afterward a new creation page will open for you to allow you to name and configure your uploader instance with variant set of options.
By following this process you can create infinite number of Filetrip Uploader with different customization to meet your business needs. For example, you can destine one uploader to forward uploaded files to Dropbox and FTP with configured folder destinations; whereas, you can destine another Filetrip Uploader to transfer your files to Google Drive with configurable folder destination.
With the following set of options, you will have the freedom of configuring multiple uploaders with different behaviors and conditions.
Filetrip Uploader options
| Option | Default | Description |
|---|---|---|
| Upload channels | empty |
Here is where you need to check the channels that you would like the files been uploaded using this specific uploader to be transmitted to, either by bulk approve or by single approval in (Menu -> Media -> Filetrip manage upload) section |
| Dropbox folder | empty |
After activating Dropbox you can use this field to define the destination Dropbox folder for digital files uploaded using this specific Filetrip uploader. |
| Automatic sub-folder creation | empty |
After activating Dropbox you can use this checkbox to create sub-folders automatically |
| Google Drive folder | empty |
After activating Google Drive you can use this field to define the destination Google Drive folder for digital files uploaded using this specific Filetrip uploader. |
| Amazon S3 folder | empty |
After activating Amazon S3 you can use this field to define the destination Amazon S3 folder for digital files uploaded using this specific Filetrip uploader. |
| Generate shared Link | '' |
Whatever channel you select will be used as base links with form & email attachment submissions. |
| Allow website guests to upload files | false |
By checking this box, visitors will be authorized to upload digital files in whatever instance you created. |
| Enforce information submission | false |
Force user to send Title and Description for every file he uploads |
| Information submission is required | false |
Users must submit information for the upload to execute. |
| Disable Drag & Drop effect | false |
Checking this option will remove drag and drop effect, and convert it into regular HTML multi-upload button |
| Disable file preview | false |
Disable file preview feature |
| Max file size (MB) | '10 MB' |
Using this option you can define the maximum size limit of a file. |
| Max file upload limit | '10' |
This option allow you to control how many uploads the users can do for every single session. |
| Strictly allow extensions | '' |
Allow only entered extensions (Use comma seperator). Leave it empty to allow WP default mime list. |
| Debug | false |
Enable debugging for trouble-shooting. |
| Debugging info target | '' |
Only works if Debug is enabled. Target HTML element, for class name add “.” letter prefix. For ID based targeting put “#” letter. |
| Uploader message | '' |
Direction for users that will be displayed in the bottom of the uploader box |
| Drop file box label | '' |
Change drop file box label from here |
| Drop box label font size | 26 |
Change the font size of the drop file box label from here. |
| Change the height of the uploader box | 100 |
Modify the height of the uploader box. |
| File Title placeholder | '' |
Only works with enforce submission option being enabled. Customize title placeholder |
| File Description placeholder | '' |
Only works with enforce submission option being enabled. Customize description placeholder. |
| Theme Options | 'section' |
Options related to plugin theme. |
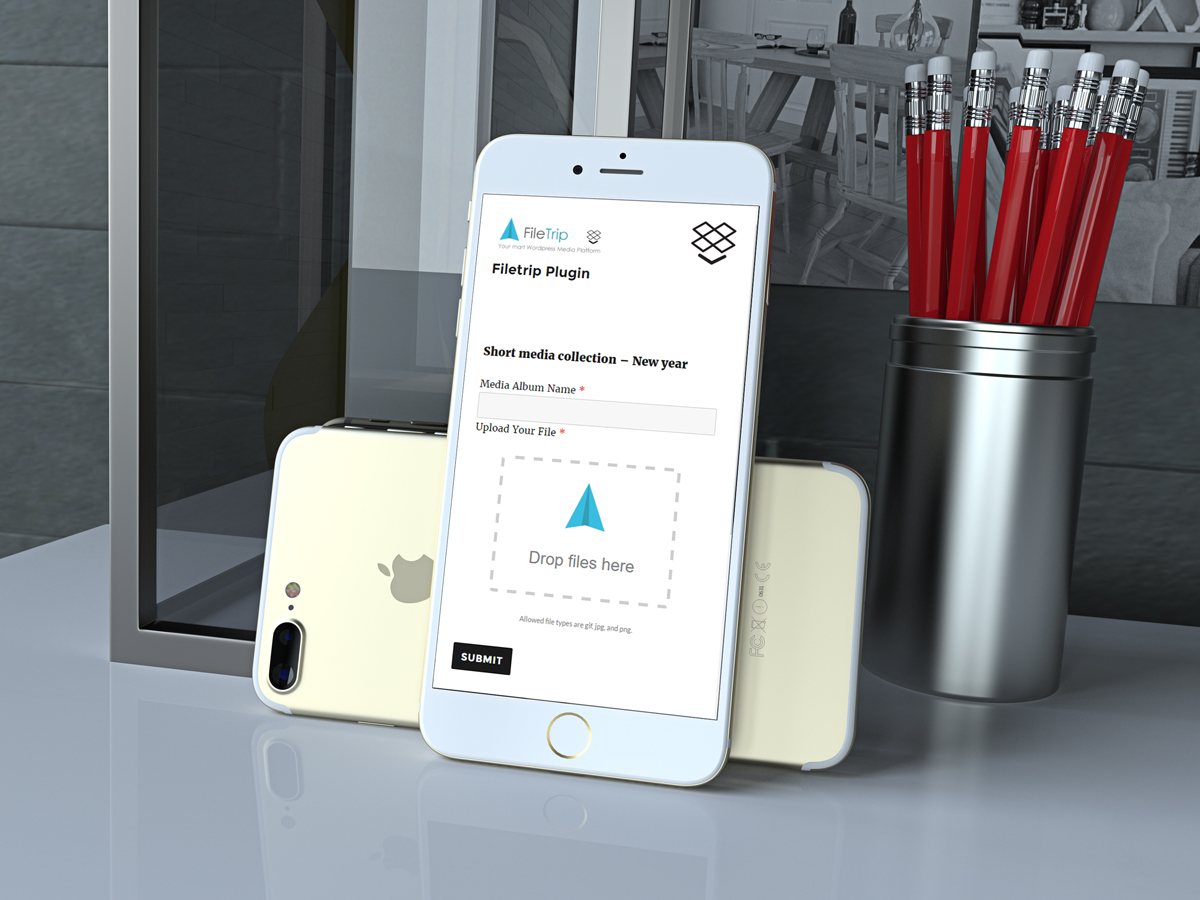
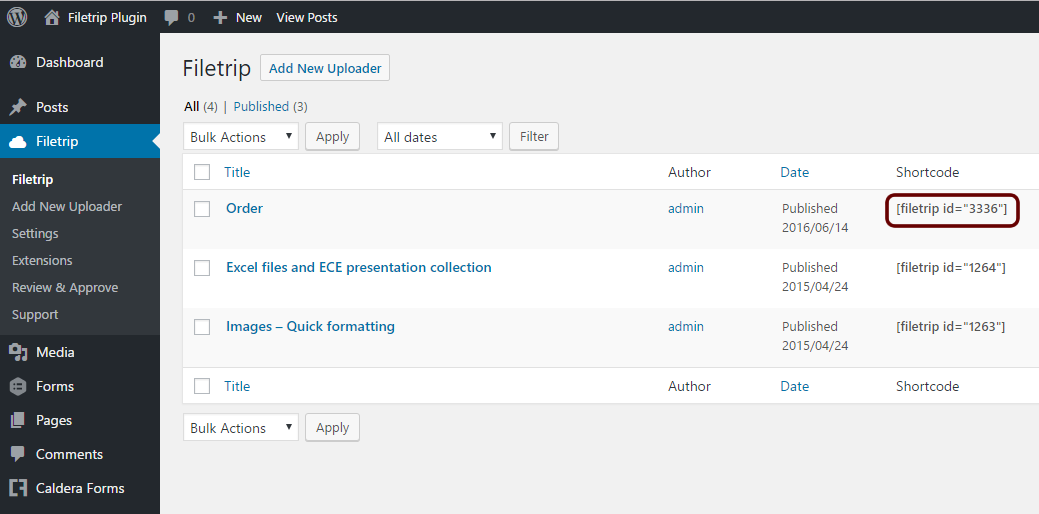
Shortcode Usage
Copy and Paste Shortcode Wherever You Like
Once a user creates a Filetrip uploader, an automatic shortcodes will be generated and listed under (Filetrip -> Filetrip Uploader Table).
Extensions
Extensions Architecture
Extension Architecture for Developers
Filetrip offers an all-in-one file distribution system for WordPress that makes it so much easier to get your files exactly where you need them to be saving your website space and consolidating your uploads in one organized location. What is great about FileTrip is that it is not only a plugin, but it is rather a framework where other developers can unleash their creativity and build their own extensions on top of FileTrip.

Extension Based Architecture to Optimize Your Dashboard Performance
FileTrip uses Extension based architecture for every single feature it provides to keep your website clean from any unnecessary features. All you have to do, is to activate whatever features you want to use from Filetrip extension page to see it installed and activated in your website.
For instance if you only need to transfer form’s uploads, backup and Media files to your Dropbox business account; just go and enable Dropbox channel only. Extension page is like a switch panel where you can turn On/Off any features according to your business need.
Rich Set of Actions & Filters for Developers
FileTrip has a built-in extension architecture that allow any developer to build custom extensions with ease. Allowing developers to play with hooks and filters to almost observe and react to all functional events.
Actions
Some of the events (actions) are:
- When a user starts an upload session;
- When a user successfully commits an upload;
- If a user deletes or rejects an upload from the Review page;
- If a user approves an upload;
- And many other core actions.
Filters
A developer can use the following sub-set of (Filters) too:
- Rename an uploaded file: Add prefixes to uploaded files as you require.
- When a channel is activated and registered: It allow developers to register new channels and integrate to the current activated channels.
- When a connector activates and registers itself to the system: It allow developers to register new form connectors and integrate to the current activated connectors.
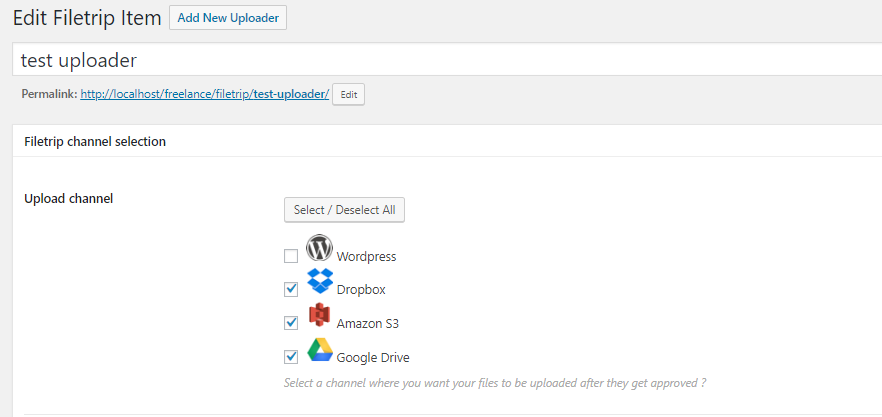
Channels
Channels
What Channels Are ?

A channel is a communication media that can connect your WordPress site to your desired Cloud destination. Once a user activates a channel from the extensions page, a set of functionality to any selected channel (Dropbox, S3, FTP and Google Drive) will be activated right away across the FileTrip plugin space:
- Bulk transfer files from Media Library to any cloud destination in a queue scheduled format;
- Integrating custom made out of the box;
- Allows you to review, (auto)approve, and transfer files to your desired folder destination;
- Allow Website backup to be forwarded to any channel folder destination.
![]()
Upload Flow Diagram
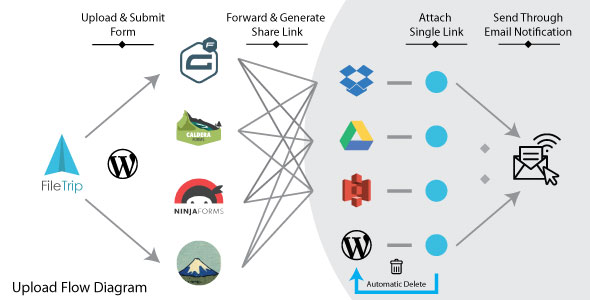
Figure (A) – FileTrip Upload Flow Diagram
In this section we are going to describe the flow of transmission of uploads to multiple channels until it reaches website admins through either notification or manual review.
FileTrip doesn’t dictate any limitation on how many channels a user can choose to submit files into; in fact you can specify all of the channels to be used as forwarders when you submit a file through FileTrip uploader instance with its configuration. So, if want to build a use case, let’s assume that site administrator has built a custom form using (Caldera Forms) and integrated FileTrip to be used as a native uploader with the following options:
Selected Channels
Let’s select the following:
- Dropbox
- Google Drive
- S3
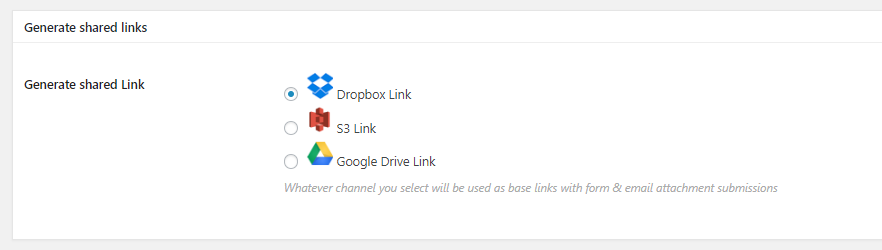
Generate shared links
Note that channels with Generated shared links are having a mutual exclusion relationship, so that if any channel was excluded you cannot use its generated links as the channel will not be used to upload any files, thus, there will be no link to share or attach to an email.
Now if a FileTrip uploader with the aforementioned configuration used in a form, the submission process will be as follow:
- Files will be uploaded to WordPress first, and they will be stored as native attachments.
- The plugin will check which channels are selected and start forwarding the files in FIFO mode to all of its selected channels, in our example (Dropbox, S3, and Google Drive) are going to have a replicate of the uploads in their pre-configured destinations.
- During the previous step, the plugin will determine which link it should generate to use it for notification, mainly through email. In our example, one uploaded files get replicated to Dropbox, FileTrip will follow-up with API calls to generate accessible links, store them in the database, and finally attach them to the eventual email notification.
- Finally, FileTrip will check if `Auto-delete` settings was enabled, it will delete any files from your local website and only retain the copies you have in the cloud.
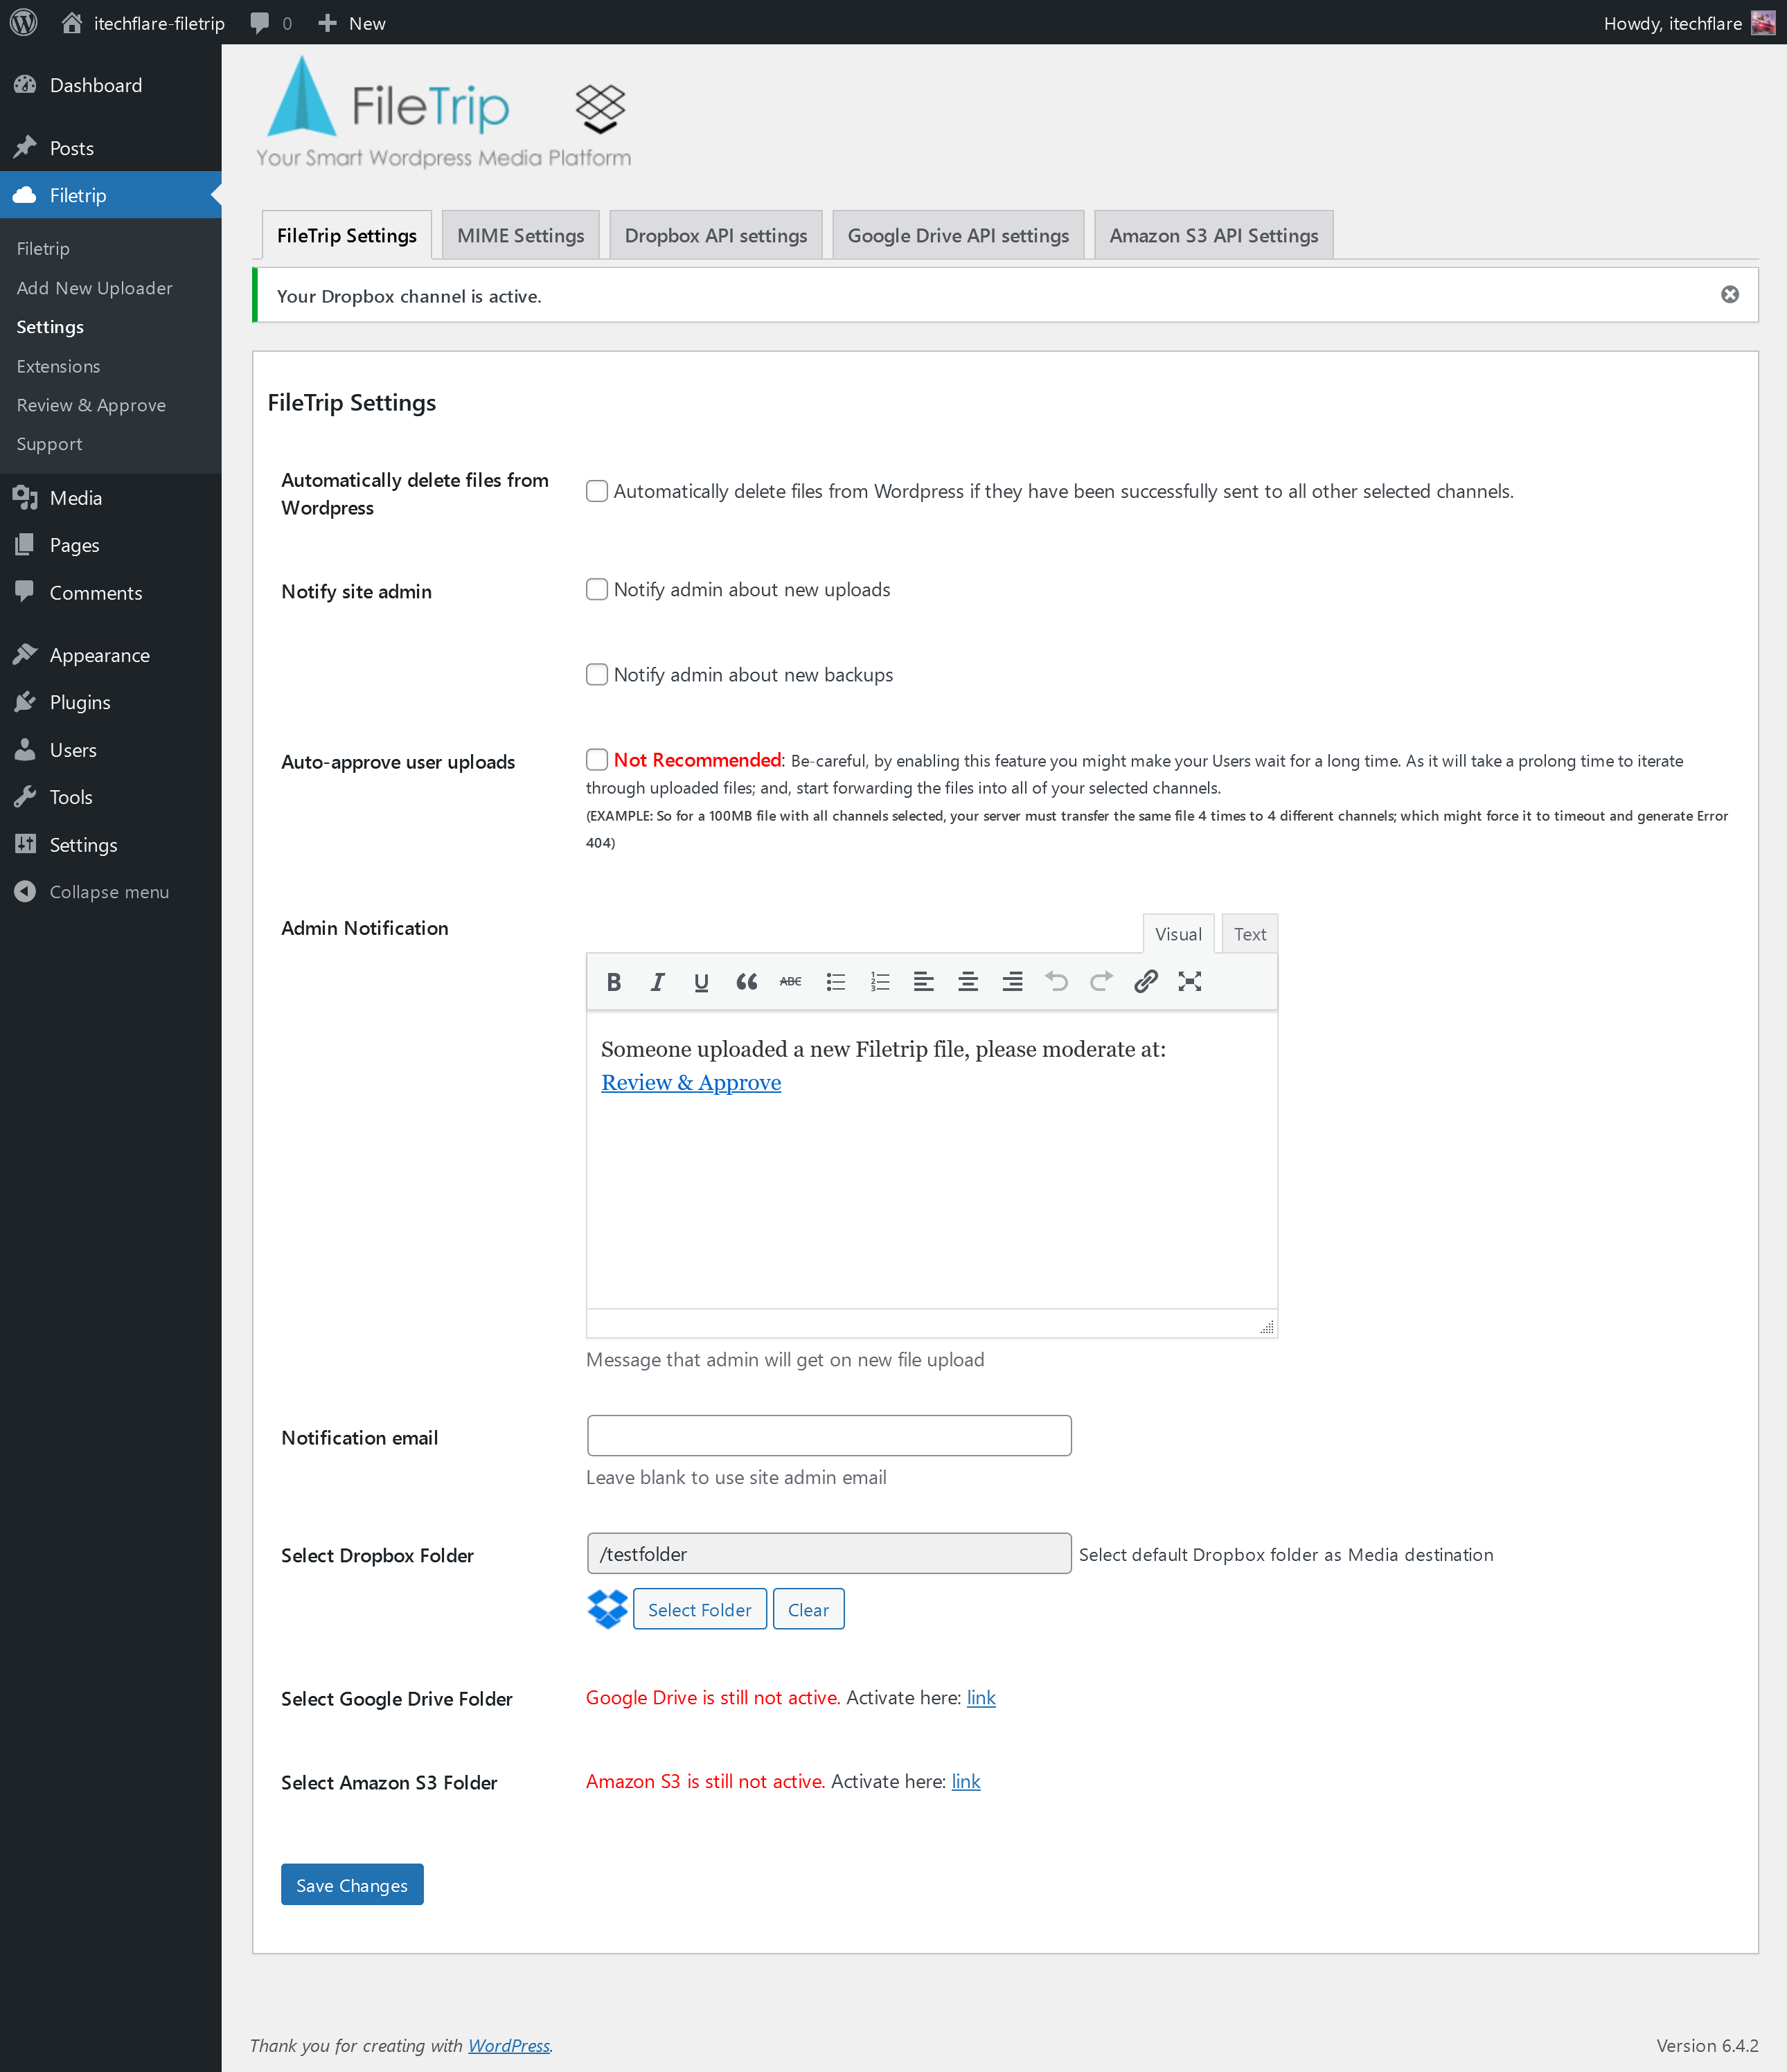
Amazon S3 Channel Activation
1. Sign in to AWS Management Console
- Go to AWS Management Console.
- Sign in with your AWS account. If you don’t have an account, you will need to create one.
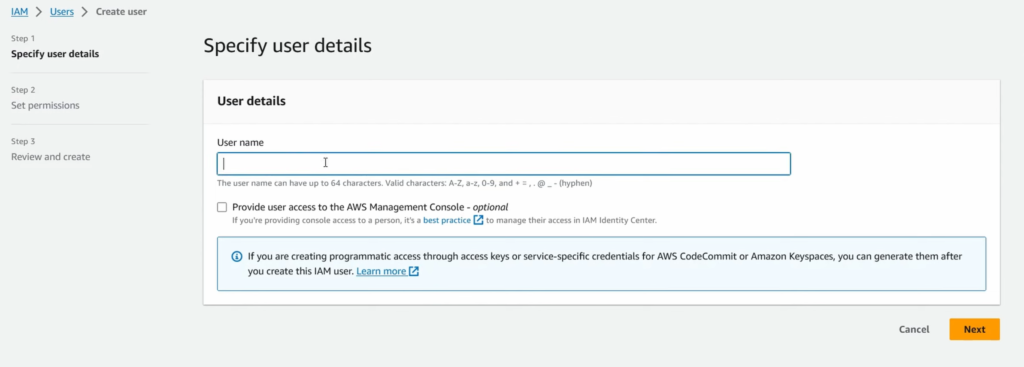
2. Create a new User and Assign Permissions
- Navigate to the IAM (Identity and Access Management) dashboard.
- Click on “Users” in the navigation pane.
- Click “Add user.”
- Enter a username.
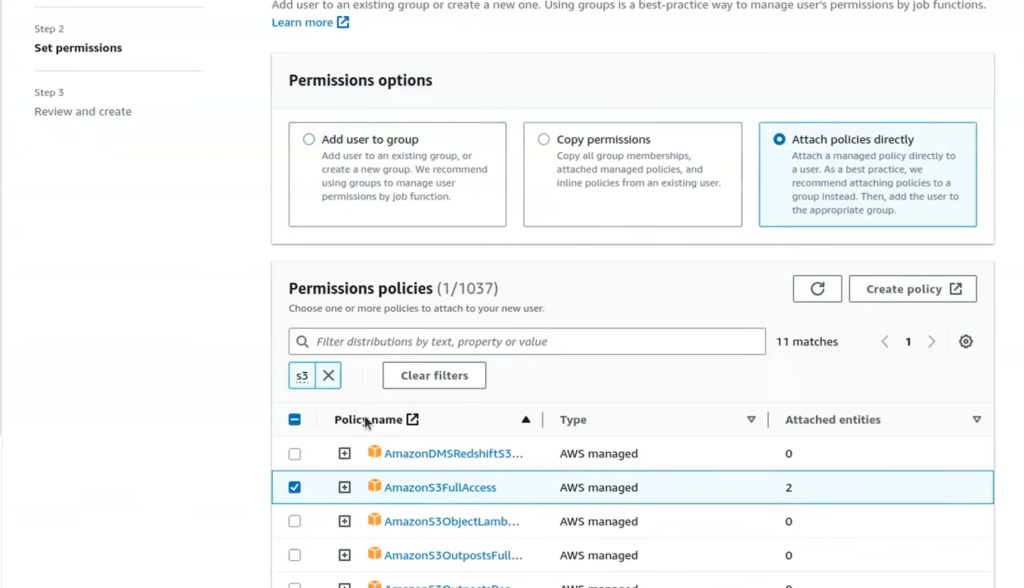
- For “Permissions options” select Attach policies directly or add the user to a group with the necessary permissions (AmazonS3FullAccess).
- Review and click “Create user.”
3. Generate Access Key for Programmatic Access
- Click on the created user, navigate to “Security credentials”. This will allow you to get an access key ID and secret access key.
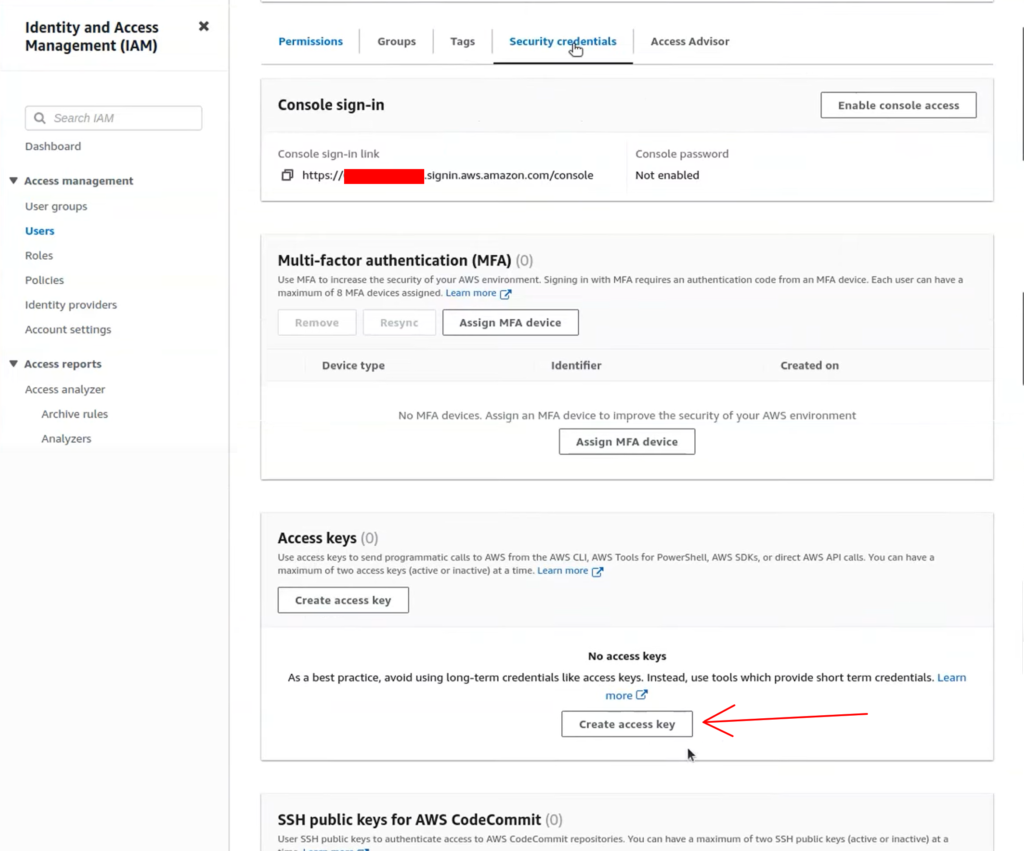
- Next: Create access key from “Access keys” sections, make sure to select “Application running outside AWS”.
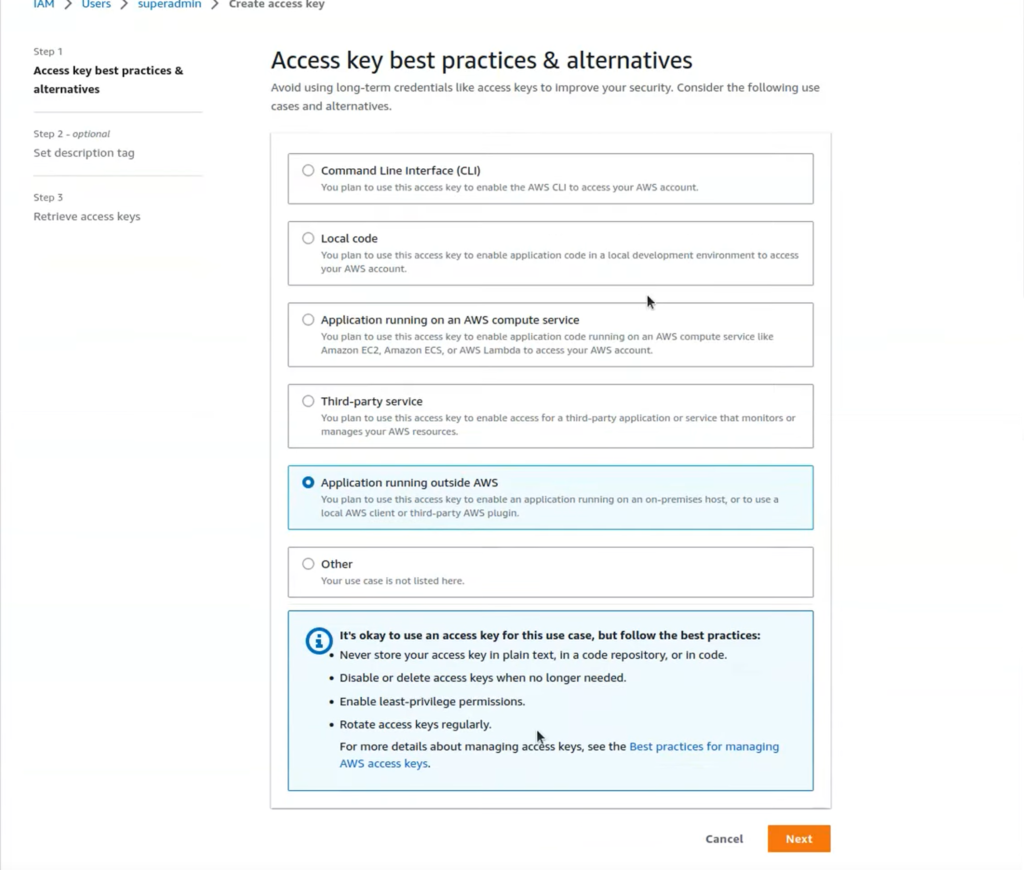
- After creation, you will see the “Access key ID” and “Secret access key.”
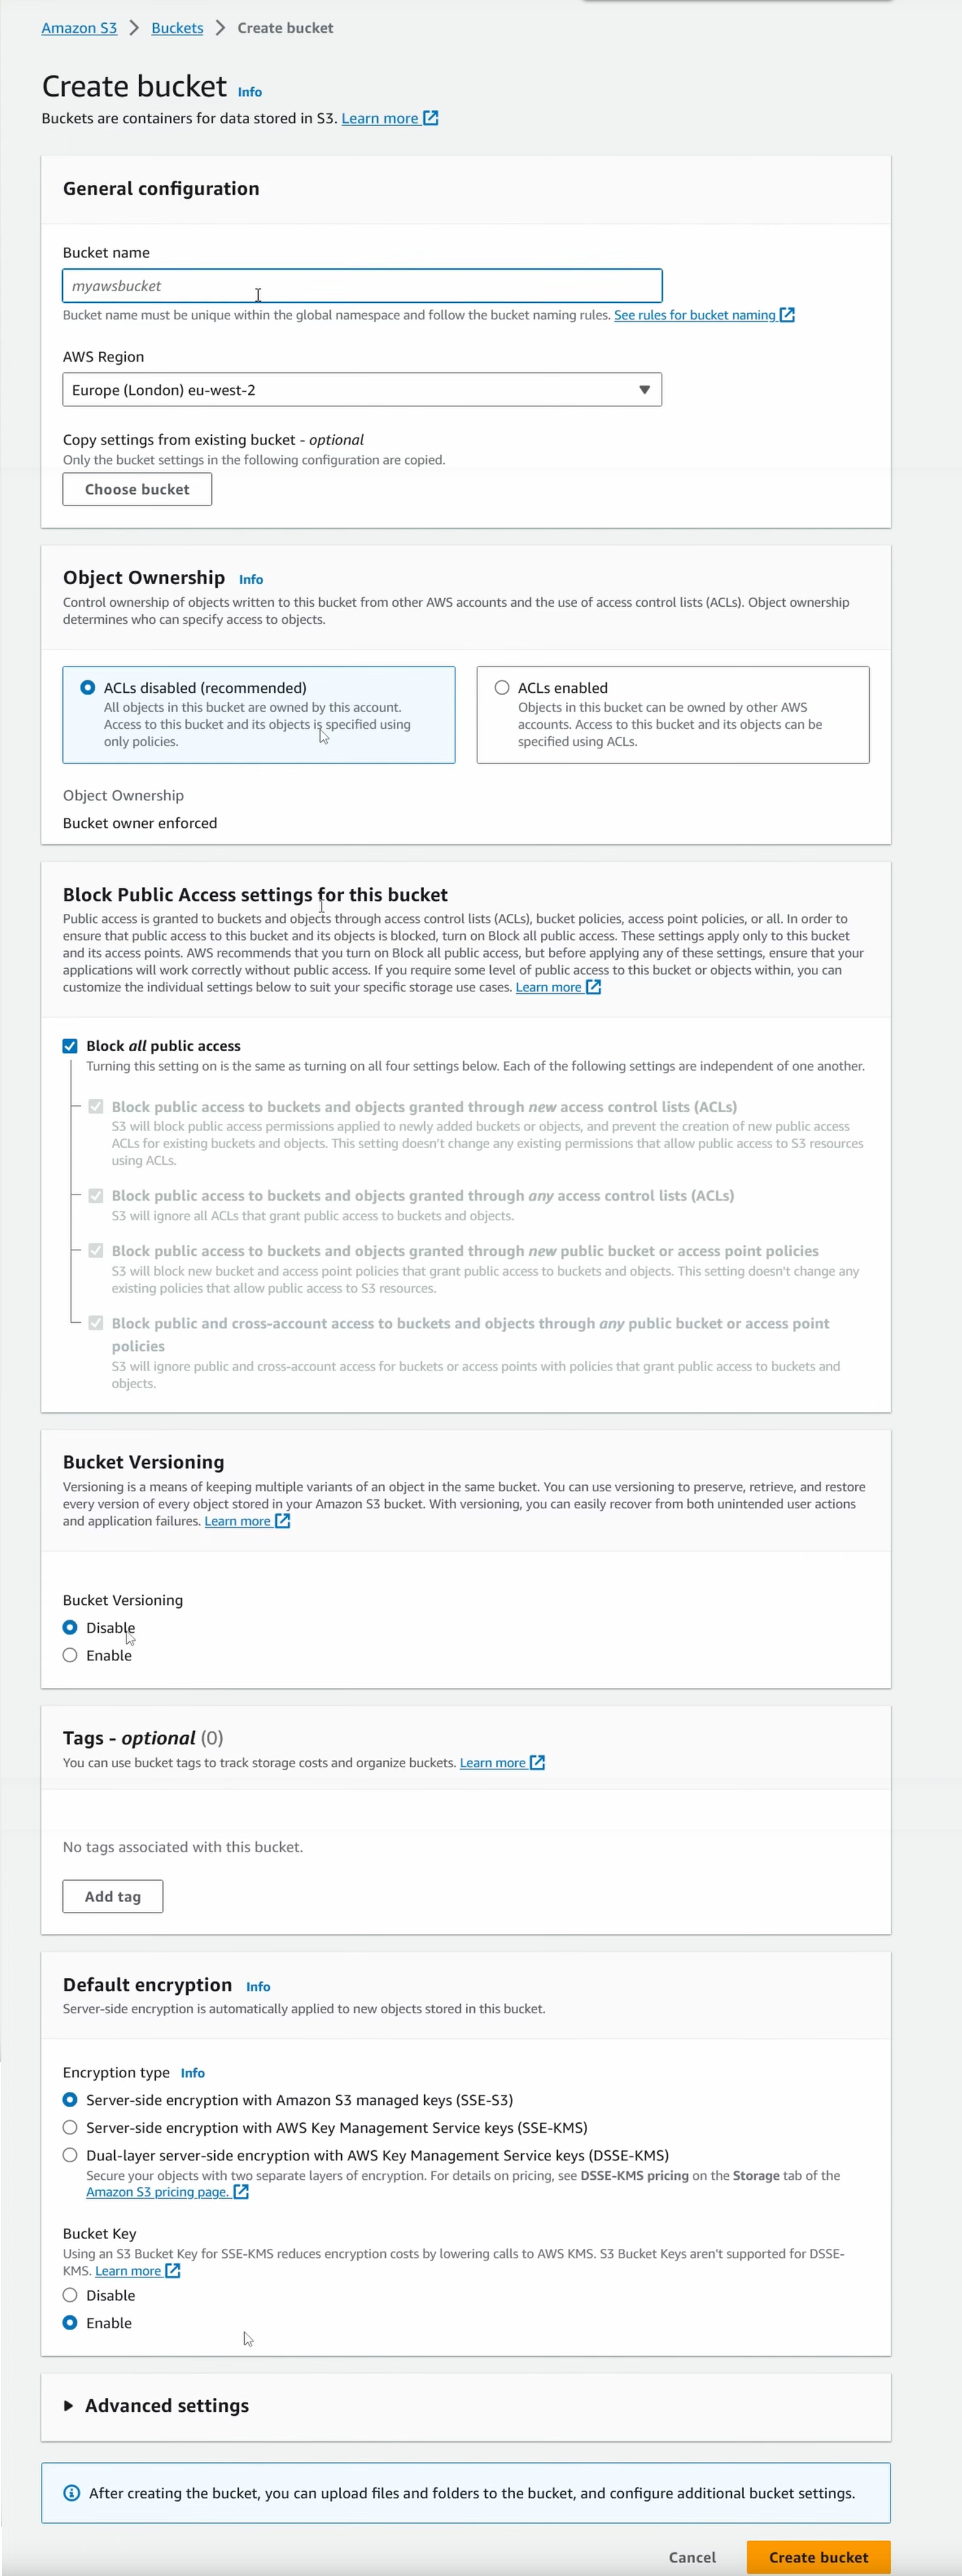
4. Create a New S3 Bucket
- Navigate to Services menu and click on “S3” under the Storage category.
- In the S3 dashboard, click “Create bucket.”
- Provide a unique name for your bucket. This will be your “Amazon Bucket Name.”
- Select the region closest to you or your user base.
- Configure options (versioning, logging, tags) as needed.
- Set up permissions – It’s crucial to manage access to your bucket correctly.
- Click “Create bucket.”
Dropbox Channel Activation
To activate Dropbox channel, please read the following instructions:
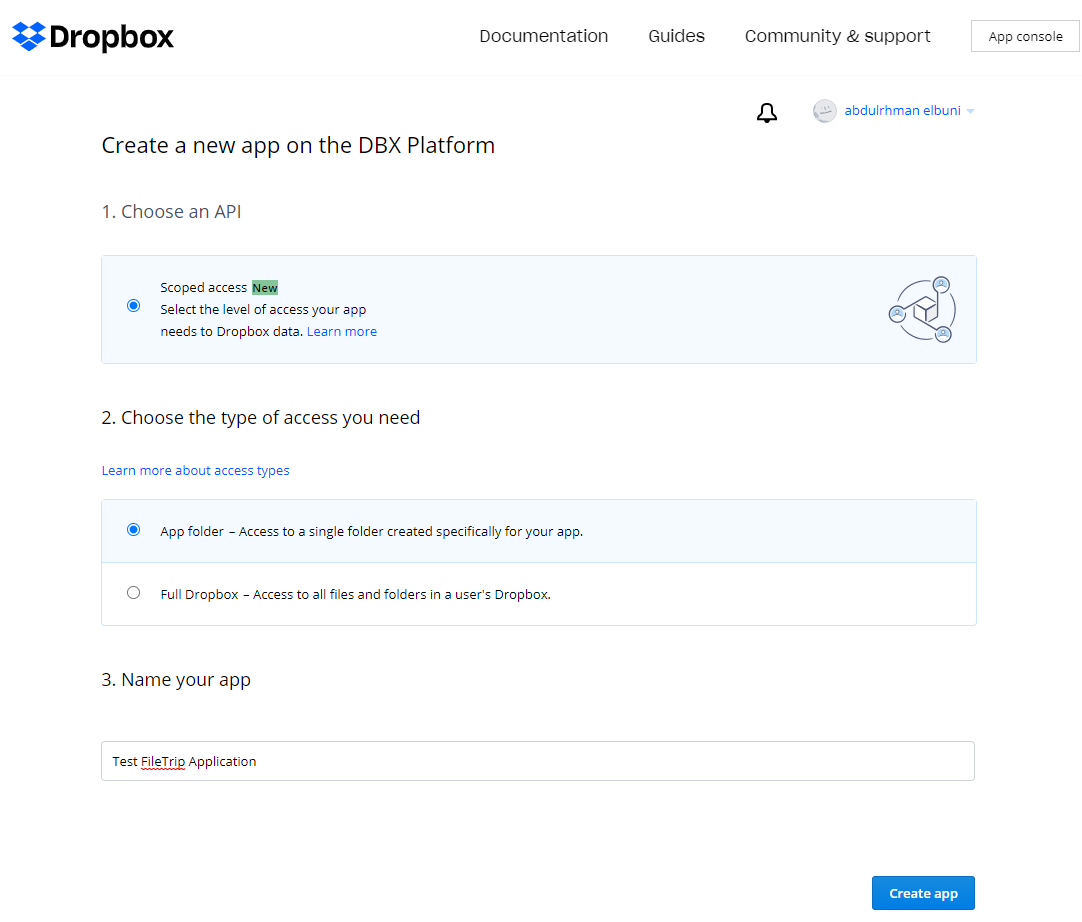
Create A New Dropbox Application
- Access Dropbox Developer console form this link
- Create a new app
- Select
Scoped accessto isolate the access of the app toApp Folderonly - Name your app
- Click on Create App button
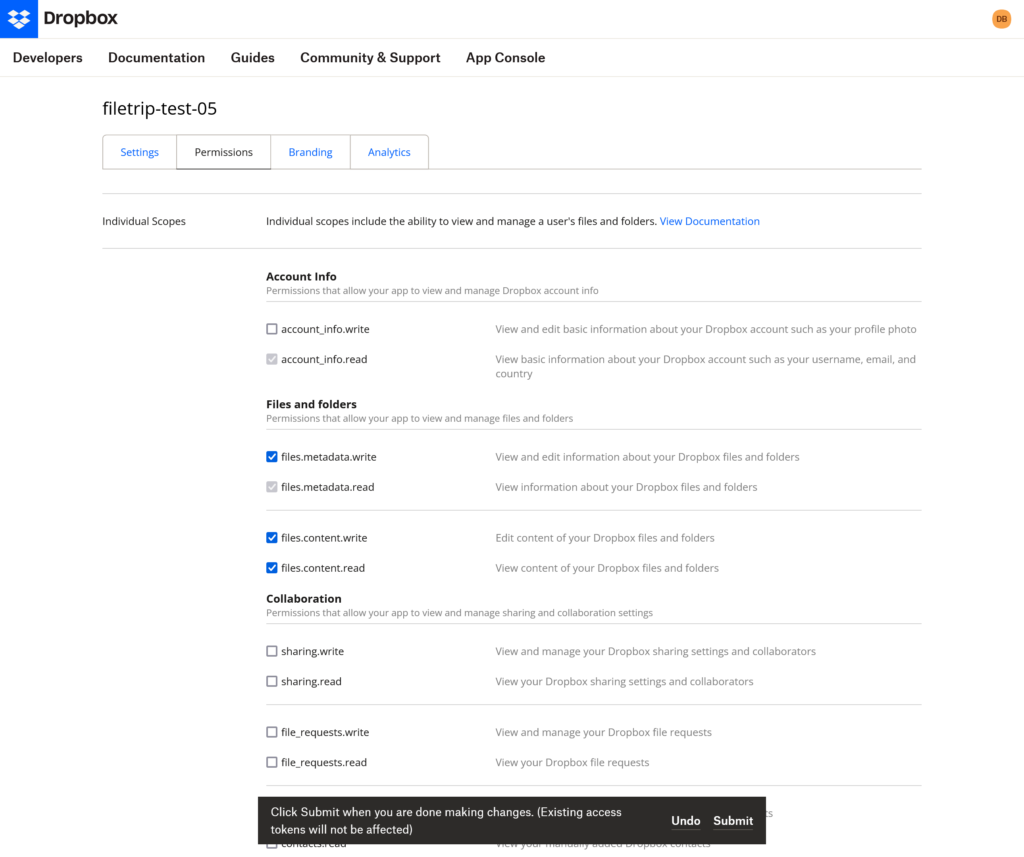
Dropbox Permissions
- Make sure to grant files and folders permissions (files.metadata.write, files.metadata.read, files.content.write, files.content.read)
- Submit changes
Next Page > Settings
- Copy App Key & App Secret and paste them under [FileTrip -> Settings -> Dropbox API Settings] tab
- Save changes and you will get a prompt that asks you to “Authorize your plugin”
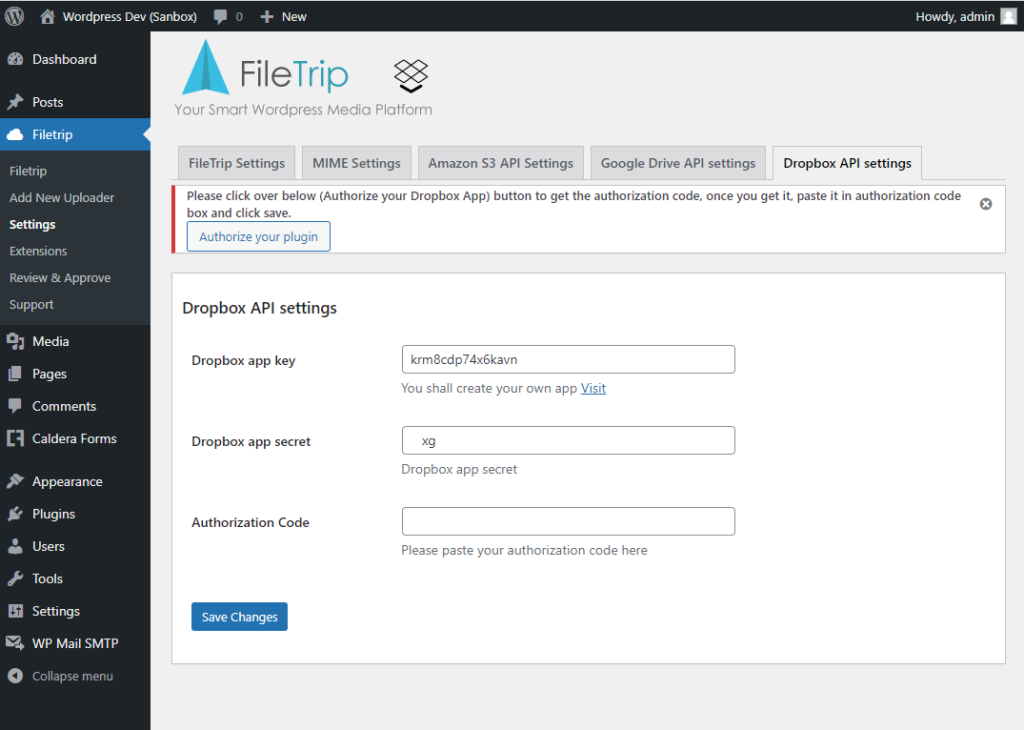
Final Step
- Finally click on “Authorize your plugin” button and follow the process until you get the “Authorization Code” generated and copy it into “Authorization code” box under “Dropbox API Settings” tab
- Done, now your plugin should be active, and your plugin should be ready to operate and access that scoped app folder
Google Drive Channel Activation
Step 1: Creating a Project in Google Cloud Console
- Go to Google Cloud Console: Open Google Cloud Console.
- Sign In/Create Account: Use your Google account to sign in or create a new account.
- Create a New Project: Click on the “Select a project” dropdown at the top and then “New Project”. Name your project and click “Create”.
Step 2: Enabling Google Drive API
- Open API & Services Dashboard: In the Google Cloud Console, navigate to the “API & Services” > “Dashboard”.
- Enable APIs and Services: Click “+ ENABLE APIS AND SERVICES”.
- Search for Google Drive API: In the API Library, search for “Google Drive API”.
- Enable Google Drive API: Click on Google Drive API and then “Enable”.
Step 3: Configuring OAuth Consent Screen
- Access OAuth Consent Screen: On the sidebar, go to “OAuth consent screen”.
- Set up Consent Screen: Choose “External” for user type, and click “Create”. Fill in the necessary details like App name, User support email, and Developer contact information.
- Add Scopes: Click “Add or Remove Scopes”. Add relevant scopes for Google Drive access.
- Save and Continue: After adding all necessary information, click “Save and Continue” until you complete the process.
Step 4: Creating and Configuring Credentials
- Access Credentials: Go to “Credentials” on the sidebar.
- Create Credentials: Click on “Create Credentials” at the top and select “OAuth client ID”.
- Configure OAuth Client ID: Select “Web application” as the Application type. Name your OAuth 2.0 client.
- Copy Filetrip Settings URL: Go back to your “WordPress Dashboard” > “Filetrip Settings” > “Settings”, and then copy the fresh link generated in your browser URL box.
- Set Redirect URI: Under “Authorized redirect URIs”, add the copied URI. This is your “Google Drive app redirect URL”.
- Create and Save: Click “Create”. You will now see your “Client ID” and “Client Secret”. Save these under Google Drive API settings tab.
- Done
Connectors
Form Connectors
What is a Form Connector
Another base component of Filetrip is the Form Connector. A connector which allow you to easily and natively inject your customized Filetrip Uploader inside of famous WordPress Form Builders.
Filetrip Form Connectors provide you with a fusion of features that allow you to enjoy the Filetrip Smart Media Platform power, and at the same time embracing your favorable WP form builders (Caldera Forms, Gravity Forms, Contact Form 7, Ninja Forms, and many more to come).
Can Developers build Connectors Over Filetrip Platform ?

In the Extensions section we have already elaborate about the architecture of Filetrip. Moreover, thankfully through Extension Architecture Design that Filetrip has; any developer can add his own extensions that can enrich customer experience and help you improve your business value.
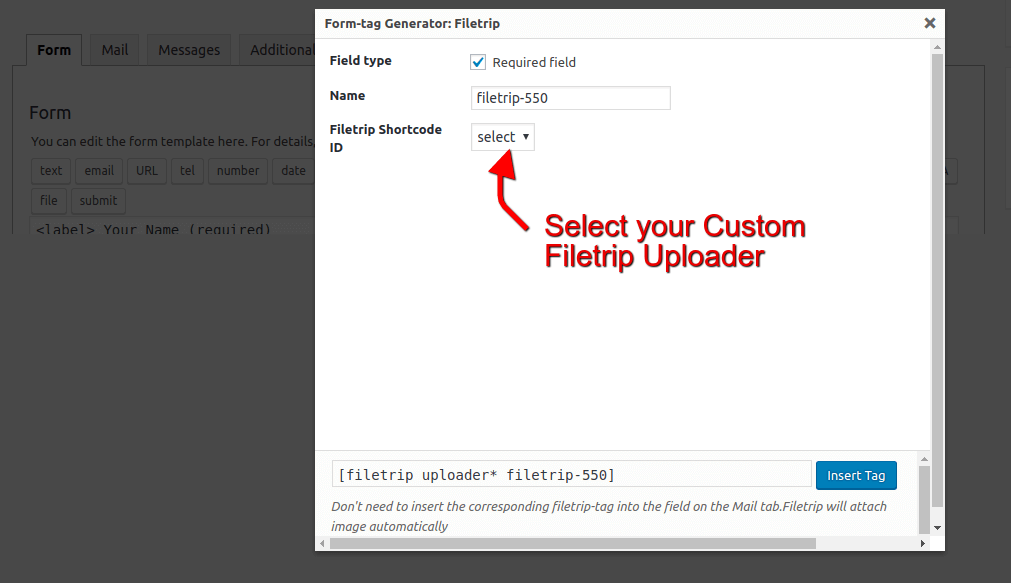
Contact Form 7 Integration
Filetrip integrates seamlessly with multiple form building plugins, including Contact Form 7. While building your forms, simply add a Filetrip Uploader with a single click.
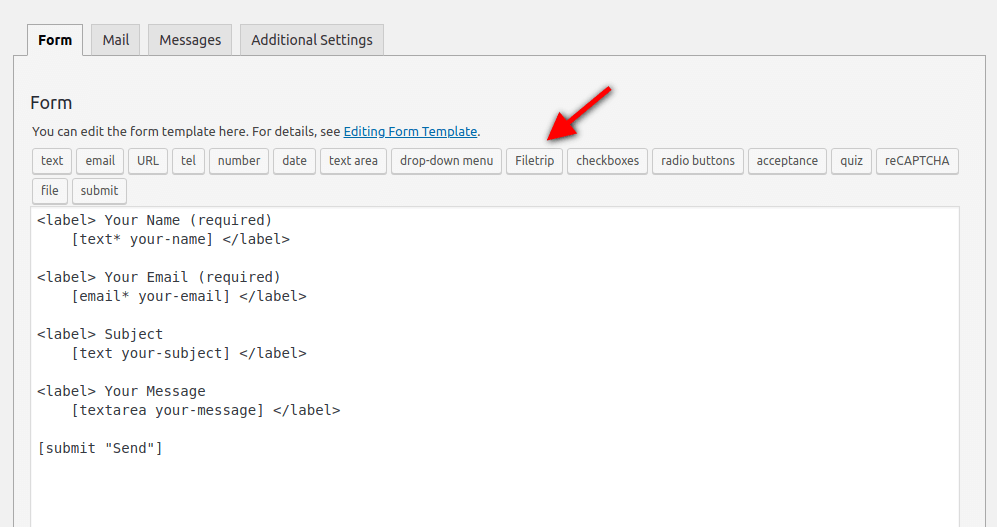
This allows you to associate user data with the file they upload.
When you add the Filetrip Uploader field, make sure you go to Field settings and select your custom Uploader form the Dropdown menu as shown in the next picture.
How I can list links inside of the body of my emails?
To attach links of the corresponding cloud channel inside of the body of your email, you can type the following tag {filetrip}, this tag will act as a placeholder that will be replaced by a list of links for your uploaded files.
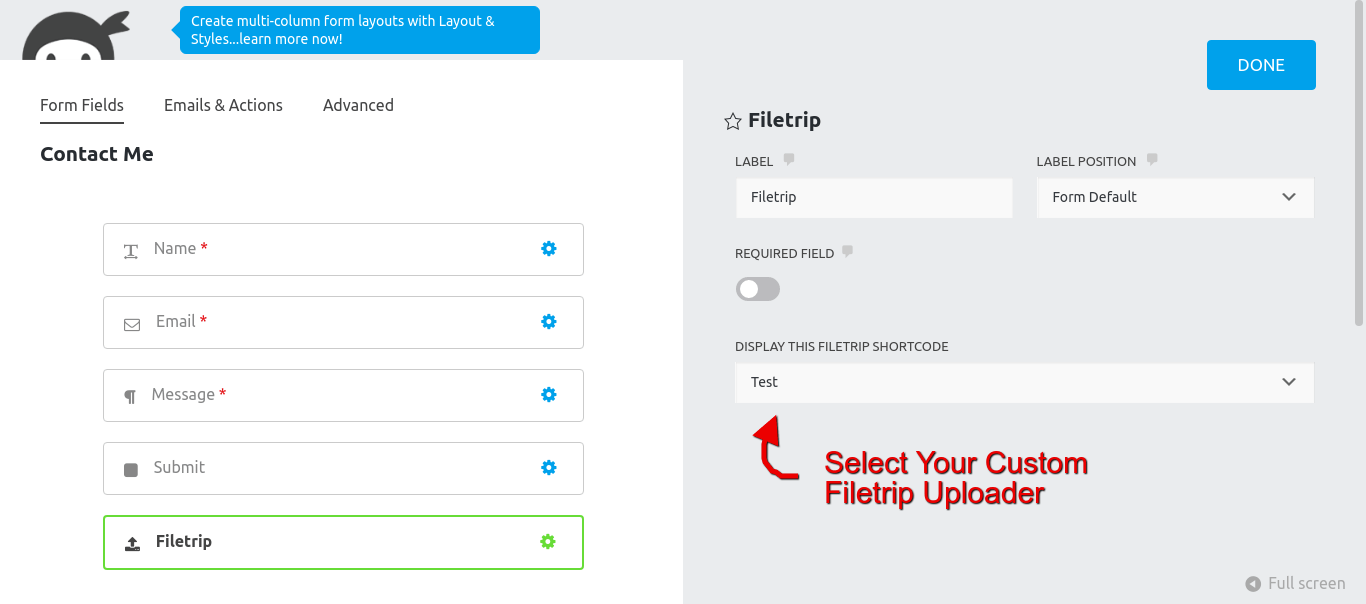
Ninja Forms Integration
Filetrip integrates seamlessly with multiple form building plugins, including Ninja Forms. While building your forms, simply add a Filetrip Uploader with a single click.

This allows you to associate user data with the file they upload.
When you add the Filetrip Uploader field, make sure you go to Field settings and select your custom Uploader form the Dropdown menu as shown in the next picture.
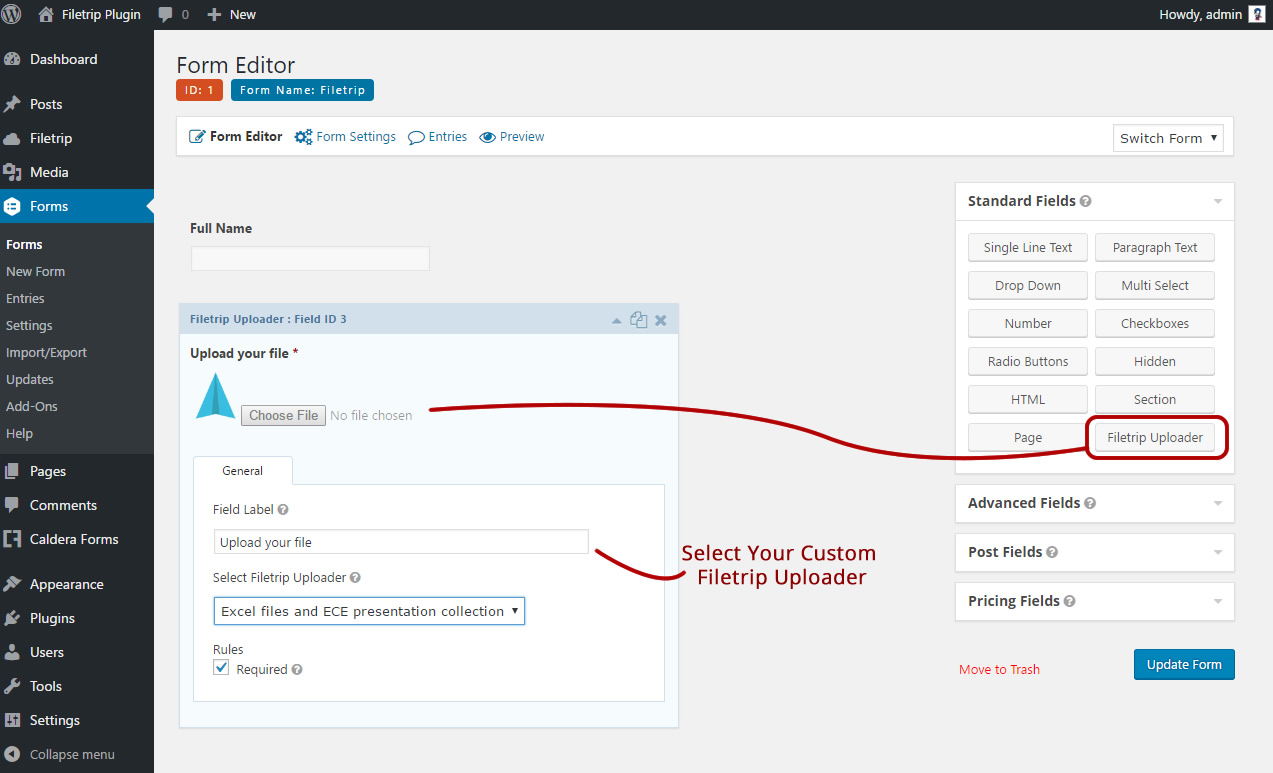
Gravity Forms Integration
Filetrip integrates seamlessly with multiple form building plugins, including Gravity Forms. While building your forms, simply add a Filetrip Uploader with a single click.
When you add the Filetrip Uploader field, make sure you go to Field settings and select your custom Uploader form the Dropdown menu as shown in the next picture.
Features
Demo Access
To check the funcionality that Filetrip provides in the backend, please use the following credentials:
Username: demo
Password: demo
Features
Summary of Features
- Store in your WordPress Media Library
- Let you create unlimited frontend uploaders that if it receive approval from administrator, it will be transmitted to whatever pre-selected pre-configured cloud storage (Dropbox, or Google Drive), or WordPress media as a singleton folder media channel
- Converts your Media library into a Filetrip compatible, where you can transmit any files with multi-gigabyte of size seamlessly in the background, in which the transmission will handeled even if the user close the transmission window, as the process might take a while.
- Back up to your own Server
- Works on Linux and Windows Servers.
- Schedule automatic backups with cloud storage transmission and email notification capabilities
- Execute manual backups and transmit them manually to whatever selected channel
- Responsive layout
- Upload notification sent through EMail
- Allow diverse MIME (File Types) that are not natively accepted by WordPress
- Isolated media section for review and approve
- Accept (Documents, Audio, Video, Music, and Archives)
- Frontend upload preview and delete features for users
- Responsive design that will make the uploader works with (Mobile, Tablets, and Desktop)
- Global setting page
- Cross browser compatibility (IE 9+, Firefox, Chrome, Opera, Safari)
- Unlimited instantiation of Filetrip uploaders with independent different settings
- Max upload size
- Max upload limit per session
- Customize theme and colors
- Change uploader’s logo
- Allow guests to upload
- Filter extensions
- Enforce title and description submission along with uploads
- Debug mode
- more
- Drag and Drop
- AJAX progress indicator