Droply.js Minimal File Upload for PHP
Documentation version 1.2
Table of Content
- Item Name : Droply.js
- Item Version : Version 1.7.1
- Minumum Required : jQuery
- Author by : mindsquare
- Support via Email : info@itechflare.com
- Support via Forum : www.itechflare.com/forum
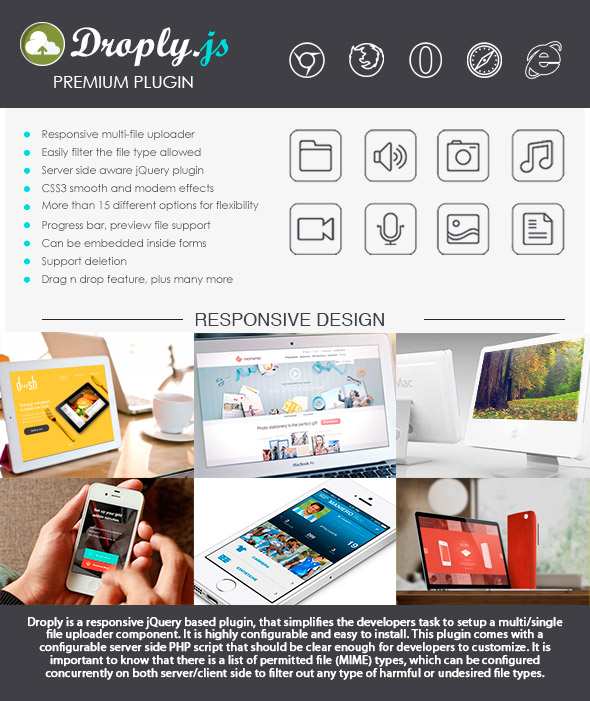
Droply.js is a minimal responsive jQuery based plugin that provide a professional & highly customizable file uploader that can smartly accepts any file type with any file size avoiding (Server Configuration Dependencies); and, this plugin will also eliminate implementation hassles and save tremendous amount of time for developers. Droply.js leverage the latest chunk upload technique to allow users to upload multi-giga bytes of digital files with extreme ease. Furthermore, This plugin could be integrated into any custom form with full compatibility, as it does only use pure jQuery to upload binary files.
What is unique about Droply.js is its minimal size and the rich features it provides. Beside that the plugin can be initiated with two line of codes from the backend and frontend, as it will be described later.
What Droply.js can do for your website?
- It provide a custom uploader with 3 different templates to provide high UI/UX.
- It allows you to change (PHP) upload processor location and folder destination with a single line of code.
- It can accept any type of file with any size up to (>2GB).
- It supports sending email notification.
- Developer friendly, developers can easily access the backend source code and customize it using pure (Object Oriented Programming) pattern.
- Modern and lightweight
- Many more
Droply.js supports chunking feature?
Notice: Droply.js can switch easily between chunk upload and regular upload. Is this useful ?
chunkUpload option. By that your customers
can work with IE10, and otherwise only IE11+ will be supported.
How to Setup (PHP)#back to top
This section describes how to setup the plugin and get it working.
Download the plugin archive from Codecanyon
- droply_processor.php file: Which is responsible of processing all of the uploaded files and store them in a specific configurable folder, and if no configuration was made, the files will initially be stored in root path inside folder named 'uploads'. To change "upload" path, you can easily access the PHP file and modify the upload path in the header section according to your need.
- processMultipleUploads.php file: Sample target file that contain Droply_Processor object responsible of processing uploads.
- icomoon.eot, icomoon.svg, icomoon.ttf and icomoon.woff: These files do have the vectorized font icons that is been used by the plugin, and it is up to you whether you want to reuse them, or replace them with your own font based icons.
- style.css file: Where it contains all of neccessary CSS styles for this plugin. You can copy the internal content and append it into your own style sheet if you need to have a one centralized style sheet.
- Finally you need jquery + droply-min.js as they are the only javascript dependencies needed.
                            <link rel="stylesheet" type="text/css" href="css/style.css">
							<script language="javascript" type="text/javascript" src="js/jquery-1.11.1.min.js" ></script>
							<script language="javascript" type="text/javascript" src="js/droply-min.js" ></script>
And here is how you can define your Droply uploader DIV in a single line::
<div id="company-files"></div>
How to Setup (.NET)#back to top
This section describes how to setup the plugin and get it working.
Download the .NET project archive from Codecanyon
- Download "Droply.js plugin" and save it to your local computer.
- Extract the ZIP archive in a folder.
- Now you need to access the attached DroplyAsp project using VS2015. Run the project afterward and you should see the uploader work in action.
- Requirements.
- Fully compatible with .NET Framework 4.5.
- To run app with 4.0 framework, you must use the MVC 3 and upgrade the Droply controller.
If you need to integrate the uploader into your custom projectHere are the files you need to get:- Download "Droply.js plugin" and save it to your local computer.
- Extract the ZIP archive in a folder.
- Now you need to access root, fonts, css, images and js folders to extract the following files:
- droply-processor.php file: Which is responsible of processing all of the uploaded files and store them in a specific configurable folder, and if no configuration was made, the files will initially be stored in root path inside folder named 'uploads'.
- DroplyController.cs file: Sample target file that contain Droply_Processor object responsible of processing uploads.
- icomoon.eot, icomoon.svg, icomoon.ttf and icomoon.woff: These files do have the vectorized font icons that is been used by the plugin, and it is up to you whether you want to reuse them, or replace them with your own font based icons.
- style.css file: Where it contains all of neccessary CSS styles for this plugin. You can copy the internal content and append it into your own style sheet if you need to have a one centralized style sheet.
- Finally you need jquery + droply-min.js as they are the only javascript dependencies needed.
                            <link rel="stylesheet" type="text/css" href="css/style.css">
							<script language="javascript" type="text/javascript" src="js/jquery-1.11.1.min.js" ></script>
							<script language="javascript" type="text/javascript" src="js/droply-min.js" ></script>
And here is how you can define your Droply uploader DIV in a single line::
<div id="company-files"></div>
Create an uploader (Frontend) #back to top
Trigger the uploader
Go to Closify menu in the dashboard, you will find a submenu "Add New Uploader", click over it to create a new uploader instance.
Droply.js deemed to be a Media clearing house that work in harmony with any Wordpress website.
Droply upload files - Features
- Frontend upload preview and delete
- Responsive design that will make the uploader works with (Mobile, Tablets, and Desktop)
- Global and local setting capabilities
- Cross browser compatibility (IE 9+, Firefox, Chrome, Opera, Safari)
- Unlimited instantiation of Droply uploaders that each could has its own segregated settings and a common backend processor
- Max upload size
- Max upload limit per session
- Customize theme and colors
- Allow guests to upload
- Filter extensions
- Debug mode
- more
- Three different skins for Multi-image uploader to almost suite any website theme.
- Drag and Drop
- AJAX progress indicator
Droply uploader options
| Option | Default | Description |
|---|---|---|
| chunkUpload | true |
This enables you to disable chunkUpload and work with IE10, IE9, and IE8. Otherwise only IE11+ and all of the other browsers will be supported. |
| limitNumberofFiles | 10 |
Limit the number of total uploaded file per session |
| debug | false |
Enable/Disable debug for tracking error for tracking obvious errors. |
| targetOutput | '.output' |
Print the output of the debug into a specific target HTML element. You can either target element by ID using '#' prefix, or by class name using '.' prefix. By default the output will not be echo'ed, because the debug is set to false, but once you enable the debug option shown above and set it to true, the debug output will start to be printed into the defined targetOutput value. |
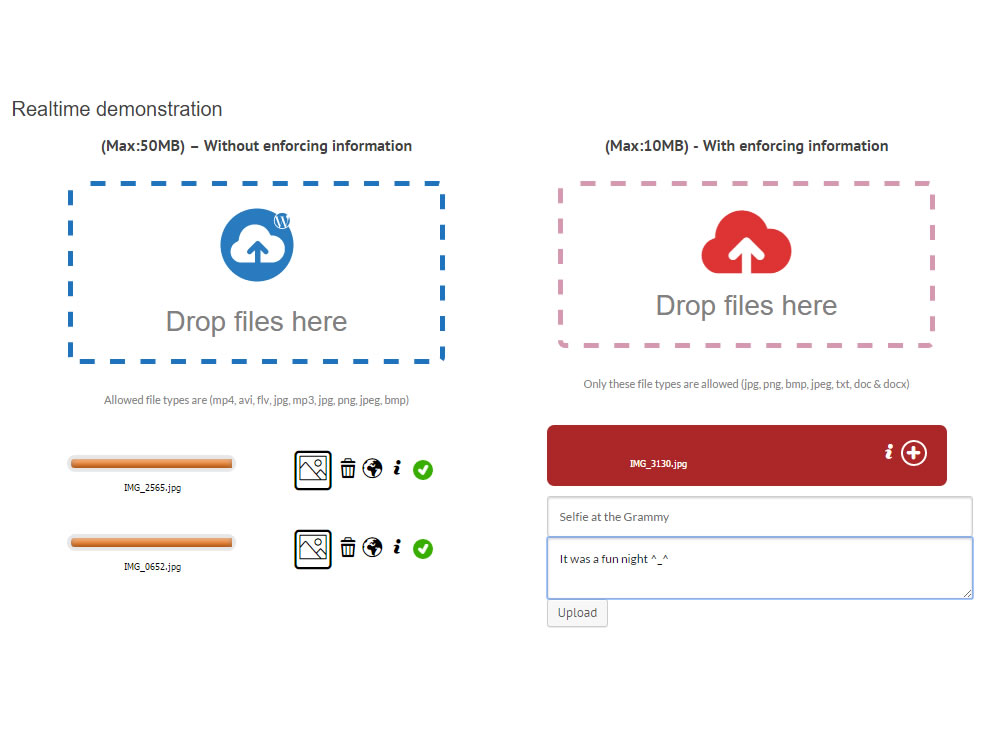
| allowedFileSize | 10 MB |
Using this option you can define the maximum size limit of a file. |
| disableRemovingItems | true |
Disable removing upload items from the list. |
| delay | 5 sec |
Define hide delay of each upload element if it is configure to be hidden. |
| multi | true |
Enable multi-file select/upload. |
| theme | 'simplex' |
You can select 3 different themes 'default', 'simplex' and 'super-simplex'.

 |
| dragDrop | true |
By setting the drag-n-drop feature to 'false', you will get the regular file upload button activated. |
| url | "processMultipleUploads.php" |
Setting the url of the processMultipleUploads.php file that is responsible of filtering and storing the uploaded files. |
| dataType | 'json' |
The type of data that you're expecting back from the server. Check AJAX |
| type | 'POST' |
Define post type "GET/POST" (POST Recommended). |
| label | 'Allowed file types are gif,....' |
Modify this option to customize the message that will be exposed to the users, who use the plugin. Generally you can list the file extensions allowed here. |
| backgroundColor | '' |
Flexibly change the background color of the upload entries. |
| labelColor | 'rgb(90, 90, 90)' |
Change the color of the plugin label. |
| logoColor | 'rgb(150, 155, 255)' |
Change the color of logo. |
| textColor | '#DADADA' |
Change the color of border line and text. |
| progressBarColor | 'red' |
This option defines the color and style of the progree bar, it can be either be set to strip of non-strip with 3 different colors:
|
| disablePostProgressAnimation | 'false' |
By enabling this option, the progress bar strip animation will disabled after uploading is complete. |
| action | 'itech_droply_submission' |
Using this option you can pass any custom JSON object to the server side along the file uploads. |
| successfulUpload | Event Type: Result will be passed as an argument |
You can use this event to get back all of the JSON result passed from the server side when a successful upload occurs. |
| failedUpload | Event Type: Result will be passed as an argument |
You can use this event to get back all of the JSON result passed from the server side when a failed upload occurs. |
| fileDeleted | Event Type: Deleted file info will be passed as an argument |
You can use this event to disable the default file delete logic and add your custom logic for file deletion. |
                        <link rel="stylesheet" type="text/css" href="css/style.css">
                        <script language="javascript" type="text/javascript" src="js/jquery-1.11.1.min.js" ></script>
                        <script language="javascript" type="text/javascript" src="js/droply-min.js" ></script>
And here is how you can define your Droply uploader DIV in a single line::
This is how you activate the Arfaly uploader, using jQuery:
                          $(document).ready(function(){

                            // ==> Option one
                            // Apply Droply to a div with default options
                            // Note that all of the default options value are listed below
                            $("#company-files").droply();

                            --------------------

                            // ==> Option two
                            // Apply Droply to a div with custom options
                            $("#company-files").droply(
                                  {
									  chunkUpload: true,
                                      limitNumberofFiles:10,              // Limit the number of total uploaded file per session
                                      debug:false,                        // Enable/Disable debug for tracking error
                                      targetOutput:'.output',             // Print the output of the debug into a specific target HTML element
                                      allowedFileSize: 1024 * 1024 * 10,
                                      disableRemovingItems:true,          // Disable removing upload items from the list
                                      delay:5000,                         // Define a hide delay of each upload element if it is set to be hidden
                                      multi:true,                         // Enable multi-file select/upload
                                      dragDrop:true,
                                      theme: 'simplex',                   // You can select 3 different themes 'default', 'simplex' and 'super-simplex'
                                      url: "processMultipleUploads.php",  // URL on where the files should be submitted
                                      dataType: "json",                   // Define AJAX dataType
                                      type: "post",                       // Define post type "GET/POST" (POST Recommended)
                                      backgroundColor:'',
                                      label:'Allowed file types are gif, jpg, png, avi, mp3, wav, mp4, doc, docx, pdf, txt, zip and rar',
                                      labelColor:'rgb(90, 90, 90)',
                                      logoColor:'rgb(150, 155, 255)',     // Change the color of logo
                                      textColor:'#DADADA',                // Change the color of border line and text
                                      borderColor:'#DADADA',
                                      disablePostProgressAnimation: false,
                                      progressBarColor: 'red',            // Change the color of the progress-bar {red, orange, and green}
                                      action:'itech_droply_submission',   // Pass a custom JSON object to the server side along the files
                                      successfulUpload: droply.successfulUpload,  // Event handler for successful file upload
                                      failedUpload: droply.failedUpload,          // Event for unsuccessful file upload
                                      fileDeleted: droply.fileDeleted             // File deleted even
                                      dropBox:{
                                        title:'Drop files here',
                                        height:100,
                                        fontSize:26
                                      },
									  required:"false", // Force the uploader to be required as a field inside a form
                                      stableUploadLbl: 'Everything going well so far!',
                                      deleteConfirmLbl:'Are you sure you want to delete the file?',
                                      maxUploadSize: 1024*1024*16,        // Define your server (max_post_size/upload_max_filesize), so the plugin can optimize chunk uploading process using this parameter
                                  });
                                }
                              );
Support Desk #back to top
Please remember you have purchased a very affordable plugin and you have not paid for a full-time web development agency. Occasionally we will help with small tweaks, but these requests will be put on a lower priority due to their nature. Support is also 100% optional and we provide it for your convenience, so please be patient and considerate.
Please visit our profile page or ask question @mindsquare
Support for my items includes:- * Responding to questions or problems regarding the item and its features
- * Fixing bugs and reported issues
- * Providing updates to ensure compatibility with new software versions
- * Customization and installation services
- * Support for third party software and plug-ins
- * Make sure your question is a valid Plugin Issue and not a customization request.
- * Make sure you have read through the documentation and any related video guides before asking support on how to accomplish a task.
- * Almost 80% of the time we find that the solution to people's issues can be solved with a simple "Google Search". You might want to try that before seeking support. You might be able to fix the issue yourself much quicker than we can respond to your request.
- * Make sure to state the name of the plugin you are having issues with when requesting support via CodeCanyon.
Files & Sources #back to top
These are the various attribution links to the Javascript files included or modified to work with in this plugin.
- 1. jquery.js
- 2. Iconmoon
- 3. droply-min.js - Responsive javascript uploader
Server side script configuration (PHP) #back to top
For those who are intersted on integrating Droply.js and its features with their own code. Here is how you can use droply-processor.php class to instantiate a backend file upload processor easily:
Server side script configuration (PHP)
                              /*
                              * jQuery Droply Plugin;
                              * http://www.itechflare.com/
                              * Copyright (c) 2016-2017 iTechFlare; Licensed: Commercial
                              * Version : v1.7.6
                              * Developer: (mindsquare)
                              */

                              // Load Droply processing class
                              include 'droply-processor.php';

                              // Setup your processor configurations
                              $configuration = array(
                                'uploadFileDestinationURL' => 'upload-folder', // From server side, define the uploads folder url
                                'maxFileSize' => 1024 * 1024 * 10, // Max 10MB
                                'fileNameFormat' => '', // By given a string here, you will allow all of the filename to be formated as '{fileNameFormat}-time-xxx.ext', where xxx are random generated numbers
                                'emailNotification' => false, // Enable if you want to recieve emails {You need to use session if you want to disable multiple notifications}
                                'adminToEmail' => 'test@test.com',
                                'emailSubject' => 'New file has been uploaded',
                              );

                              // Initialize allowed extensions array, you can add-in as many as you want
                              $allowedExts 	= array(
                                    "gif",
                                    "jPeg",
                                    "jpg",
                                    "png",
                                    "avi",
                                    "mp3",
                                    "wav",
                                    "mp4",
                                    "dOc",
                                    "docX",
                                    "txt",
                                    "zip",
                                    "rar"
                                );

                              // Instantiate an object using your own custom configuration and extension filter
                              $droply = new Droply_Processor($configuration, $allowedExts);

                              // Start processing uploads by calling process_upload() function
                              $droply->process_upload();

                              // Done :)
Server side script configuration (ASP.NET) #back to top
For those who are intersted on integrating Droply.js and its features with their own code. Here is how you can use Droply.cs class to process uploads easily at any desired endpoint:
Server side script configuration (.NET)
                            using Newtonsoft.Json;
							using Newtonsoft.Json.Serialization;
							using System;
							using System.Collections.Generic;
							using System.Diagnostics;
							using System.IO;
							using System.Linq;
							using System.Net;
							using System.Net.Http;
							using System.Net.Http.Headers;
							using System.Text;
							using System.Threading.Tasks;
							using System.Web;
							using System.Web.Http;
							using System.Web.Http.Description;

							namespace DroplyAsp.Controllers
							{
								public class DroplyController : ApiController
								{
									[Route("api/droply")]
									[HttpPost]
									public async Task UploadFile(HttpRequestMessage request)
									{
										// Setup your processor configurations
										var configuration = new DroplyСonfigration()
										{
											AllowedExtensions = new string[] { "gif", "jPeg", "jpg", "png", "avi", "mp3", "wav", "mp4", "dOc", "docX", "txt", "zip", "rar" },
											EmailNotification = true,
											EmailSubject = "Hello! New file has been uploaded",
											FileNameFormat = "prefix",
											MaxFileSize = 1024 * 1024 * 10,
											UploadFileDestinationURL = "upload-folder"
										};

										// Instantiate an object using your own custom configuration and extension filter
										var droply = new Droply(configuration);

										// Start processing uploads by calling process_upload() function
										return await droply.ProcessUpload(request);

										// Done :)
									}
								}
							}
Version History (Changelog) #back to top
Once again, thank you so much for purchasing this plugin. As I said at the beginning, I'd be glad to help you if you have any questions relating to this plugin. No guarantees, but I'll do my best to assist. If you have a more general question relating to the plugins on Codecanyon, you might consider visiting the forums and asking your question in the "Item Discussion" section.
Changelog
						= 1.3 (2016-03-12)
							- Initial release (Read docs for more detailed information)