"Closify plugin" Documentation
“Closify premium plugin”
Last Updated:05-01-2017
By: iTechFlare Ltd
Thank you for Downloading "Closify premium plugin" for your website.
Closify is a jQuery based plugin, that simplifies the developers task to create unlimited number of dynamic image containers; with different shapes (Rectangular, Oval & Circular), and, with different dimensions according to their website design. With closify the developers can easily create uploadable and adjustable (cover, profile, or any other custom image container) with a single line of code as shown below. Intelligently enough the Closify plugin would resize the image according to the size of the container set, with a respect of the image aspect ratio, and then it starts to generate a dynamic widget in the front-end, with a flixable slide menu for each container that has four different options: (Upload, Reposition, Save and Delete).
- Upload: The user can click this button and upload the desired image to be processed and seamlessly returned to perfectly fit the container.
- Reposition: The uploaded images might have either a longer hieght or a longer width in respect to the container, and conveniently the plugin gives the user the capability to position/reposition his image according to his taste at any time.
- Save: Clicking this button will save the position offset (offsetX & offsetY) and then send it to server for post-processing. Developer need to handle the SQL Script on where to save this info, and re-apply it later.
- Delete: Delete the image from the container, and send a POST request to the server with {'command'='delete',id='img-container-id'}.
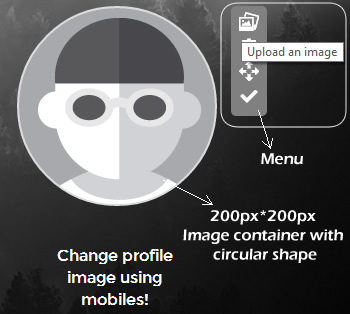
Sample closify container's view
Setup
- Download "Closify plugin" and save it to your local computer.
- Extract the ZIP archive in a specific folder.
- Now you need to access root, fonts, css, images and js folders to extract the following files:
- processupload.php file: Which is responsiple of processing all of the uploaded images and store them in a specific configurable folder, by default this configurable folder is set according to the level of this php file, into "uploads" folder. To change this folder you can easily access the PHP file itself, and modify the upload url in the header section according to your need.
- target.eot, target.svg, target.ttf and target.woff: These files do have the vectorized font icons that have been used in the tool bar menu for Closify, and it is up to you whether you want to reuse them, or replace them with your own font based icons. Their size are considerably small compared to regular PNG and JPEG static images.
- style.css file: Where it contains all of neccessary styles for this plugin, you can copy the internal content and append it into your own style sheet if you need to have a one centralized style sheet.
- ajax-loader.gif + arrow-upload-icon.png from images folder.
- Finally you need jquery + UI jquery + closify-min.js to fulfill the plugin requirements.
- It is recommended to leave every image file in a its designated folder as ordered in the archive package, if you need to redistribute them, make sure to reference them accordingly by modifying CSS.
									<link rel="stylesheet" type="text/css" href="css/style.css">
									<script language="javascript" type="text/javascript" src="js/jquery-1.11.1.min.js" ></script>
									<script language="javascript" type="text/javascript" src="js/jquery-ui.min.js" ></script>
									<script language="javascript" type="text/javascript" src="js/closify-min.js" ></script>
									<div id="tiny-img" class="closify" height="100" width="400"></div>
									<div id="profile-img" class="closify" height="300" width="300"></div>
Apply your settings for the plugin
This is how you activate the HTML containers, using the Closify plugin:
						$(document).ready(function(){

							// Closify a div with default options
							$("#tiny-img").closify();

							// Closify a div with custom options
							$("#profile-img").closify(
								{
									menuBackgroundColor:"rgba(0, 10, 255, 0.99)",	// Change menu background color
									menuTextColor:"yellow",							// Change menu text color
									progressBarColor:'red',				// Change progress bar color
									loadingImageUrl: 'assets/img/ajax-loader.gif',
									backgroundImageUrl: 'assets/img/arrow-upload-icon.png',
									startWithThisImg:'assets/img/profile.png',
									position: {top:'10px',left:'0'},
									circularCanvas: false,
									hardTrim: true,
									responsive: true,
									quality: 1,
									dynamicStorage:false,
									topLeftCorner: true,				// Enable or disable top-left round corner to get various container shapes
									topRightCorner: true,				// Enable or disable top-right round corner to get various container shapes
									bottomLeftCorner: true,				// Enable or disable bottom-left round corner to get various container shapes
									bottomRigthCorner: true,			// Enable or disable bottom-right round corner to get various container shapes
									progress:false,						// Enable progress bar
									allowedFileSize: 1024 * 1024 * 10, 	// (10 MB) Maximum image size limit
									url: "processupload.php",			// URL on where the photo should be submitted
									targetOutput: "#output-profile-img",// Where to render errors and notification messages
									error: anyFunctionTarget, 			// Event handler for upload error
									success: anyFunctionTarget, 		// Event handler for successful upload
									uploadProgress: anyFunctionTarget, 	// Event handler for upload progress (In Percentage)
									beforeSubmit:  anyFunctionTarget 	// Before submission event handler
									finishUploading: anyFunctionTarget, // Event handler for finish image upload
									finishCropping: anyFunctionTarget	// Event for finish image cropping action
								});
							}
						);
As you can see you can either Closify a DIV with default options as for the #tiny-img case, or overriding the options as shown for the #profile-img case.
Plugin options
| Option | Default | Description |
|---|---|---|
| menuBackgroundColor | black |
This will change the menu background color. |
| menuTextColor | white |
This will change the color of the font based icons of the menu. |
| loadingImageUrl | 'images/ajax-loader.gif' |
Option to load tweets with a specific hashtag. |
| backgroundImageUrl | 'images/arrow-upload-icon.png' |
it sets the background image of the closify canvas. |
| startWithThisImg | '' |
You can use this option to set an initial picture that will be shown in the canvas. |
| position | '{top:"0", left:"0"}' |
You can use this option in conjuction with 'startWithThisImg' option to pass saved top/left position for any picture, to be placed correctly as configured. |
| circularCanvas | 'false' |
By enabling this option, the plugin will change the style of the container to have a circular type of edges. |
| hardTrim | 'true' |
By enabling this option the plugin will trim the extra image residue from outside image container. |
| responsive | 'true' |
Make the uploaded image container to be responsive. |
| quality | '1' |
It accepts [1,2, and 3] as values. You can use this option to change the image sampling and resolution to be 1x, or 2x, or 3x, whatever the developer found it to give sufficient quality for the image. |
| dynamicStorage | 'false' |
By enabling this option the plugin will intelligently starts to retrieve the last uploaded image and place it inside the container automatically. It works well with hardTrim option being enabled! |
| allowedFileSize | 10 MB |
Using this option you can define the maximum size limit of a picture. |
| targetOutput | '#output-{your-canvas-id}' |
Modifying this option will give you the capability of relocating the notification output into your desired location. For classes use '.myClass' and for ID's use '#myId'. |
| progress | false |
By setting this option to "true", a progress bar feature will be enabled. |
| progressBarColor | 'red' |
This option defines the color and style of the progree bar, it can be either be set to strip of non-strip with 3 different colors:
|
| url | "processupload.php" |
Setting the url of the processupload.php file that is responsible of processing and storing the uploaded images. |
| error | Event Type: closifyError(error) |
Using this call-back the developer could catch the errors message using the single argument passed "error" by fetching the value as "error.responseText". |
| success | Event Type |
You can use this event to make your own post processing logic. |
| uploadProgress | Event Type: uploadProgress |
Callback function to be invoked with upload progress information (if supported by the browser). The callback is passed the following arguments:
|
| beforeSubmit | Event Type |
It is recommended to keep it to default. By default this will be set to the internal "beforeSubmit" function to handle and validates the inputs, and if the developer wants to change it, he should handle:
|
| finishUploading | Event Type: Result will be passed as an argument |
You can use this event to get back the all of the JSON result passed from the server side. |
| finishCropping | Event Type: Result will be passed as an argument |
You can use this event to get back the all of the JSON result passed from the server side. |
All of the options listed above could be overridden as shown in the previous code snippet.
Server side configuration
From the server side there will be only one PHP file that should process the images that have been uploaded from the client side, and this single processing file is represented by the "processupload.php" file. This file is responsible of generating proper photos/thumbnails, where the resized photos are sent back to the client side using AJAX to be shown to the user seamlessly.
Here are the options that you can configure yourself to change the behaviour of the processing:
							############ Edit settings ##############
							$imageName				= $_POST["ImageName"];
							$imageURLFromClient		= 'uploads/'; // From client side, define the uploads folder url ?
							// This need to be changed if you change the location of uploads folder
							$ThumbSquareSize 		= 200; //Thumbnail will be 200x200
							$container_width 		= $_POST["w"];
							$container_height 		= $_POST["h"];
							$thumbnails				= false; // Disable generating thumbnails
							$ThumbPrefix			= "thumb_"; //Normal thumb Prefix
							$DestinationDirectory	= getcwd().DIRECTORY_SEPARATOR.'uploads'.DIRECTORY_SEPARATOR; //specify upload directory ends with / (slash)
							$Quality 				= 90; //jpeg quality
							##########################################
However, it is your task to store the image url generated from this code into database so it can be rendered later according to the UserID, where the UserID will point the user who uploaded the pictures. And also there is another place where you can retrieve the image offset from users so it can be save or stored for later usage. The "processupload.php" is considered to be highly documented and easy to read, and you will have hints inside to where you supposed to put your processing code for the above mentioned reasons as follow:
							First of all wherever you find this comment:

							############ Put your custom code here ##############

							This means that you can harness this space to add your own logic.

							Other specific places to look:
						1.
							/****************************************************/
							/****************************************************/
							/*
							// Insert info into database table!
							mysql_query("INSERT INTO myImageTable (ImageName, ThumbName, ImgPath)
							VALUES ($DestRandImageName, $thumb_DestRandImageName, 'uploads/')");
							/****************************************************/
							/****************************************************/
						2.
							// Handling position save command
							if(isset($_POST["top"]) || isset($_POST["left"]))
							{
								// When somebody saves a picture you can read "top" and "left" and save them, so it become stored
								// play with "left / top" image position
								echo "Success";
							}

							// Handling image delete command
							// POST
							// command: delete
							// id: The ID name of the specific image container that has been deleted
							if(isset($_POST["command"]) && isset($_POST["id"]))
							{
								// When somebody delete a picture, the corresponding action should be put here

								echo "Deleted";
							}
Sources and Credits
We've used the following images, icons or other files as listed.
- imagesLoaded - https://github.com/desandro
- jQuery - http://jquery.com/
- Iconmoon - Icon-Moon
- Support - Get fast 48 Hr support
Demo page
Once again, thank you so much for purchasing this theme. As we said in the beginning, we will be happy to help you if you have any questions relating to this theme. We take pride in our work and care about our users. Thanks again!
Copyright © 2009-2017 iTechFlare. All Rights Reserved.